Spring OAuth2 學習整理
OAuth2 介紹
OAuth2是目前最流行的授權機制,用來授權第三方應用,獲取用戶數據。
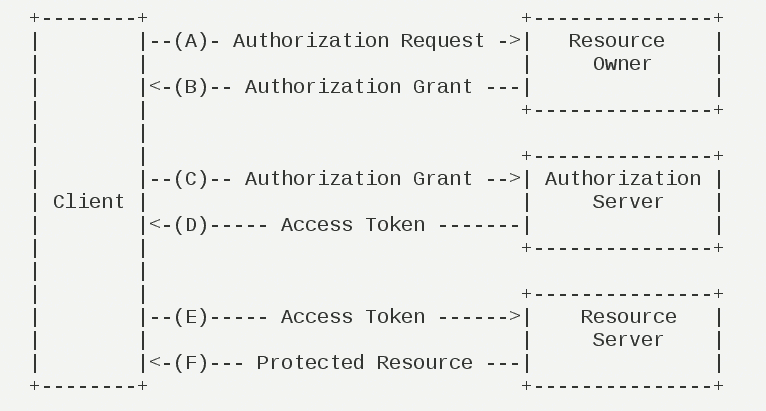
博客提供的流程圖中有一點需要注意的是C步驟是用戶參與完成驗證,驗證之後Client拿到對應的Access Token 再進行後續操作.這時Client可以是第三方服務器或者瀏覽器js存儲. OAuth運行流程

說明
spring官方發佈了blog ,最新版的SpringSecurity已經不支持創建一個授權服務器,轉而提供一個標準的授權服務....
下面的代碼是一個單項目,包含了授權服務,資源服務.使用mybatis-plus自定義了用戶信息查詢和客戶端信息查詢.
配置
<dependency>
            <groupId>org.springframework.boot</groupId>
            <artifactId>spring-boot-starter-security</artifactId>
        </dependency>
        <dependency>
            <groupId>org.springframework.cloud</groupId>
            <artifactId>spring-cloud-starter-oauth2</artifactId>
        </dependency>
@Configuration
//資源服務配置
@EnableResourceServer
//認證服務配置
@EnableAuthorizationServer
public class OAuth2Config extends AuthorizationServerConfigurerAdapter {
    @Autowired
    private AuthenticationManager authenticationManager;
    @Autowired
    private UserDetailsService userDetailsService;
    @Autowired
    private SysClientDetailsService sysClientDetailsService;
    /**
     * 定義授權和令牌端點以及令牌服務
     */
    @Override
    public void configure(AuthorizationServerEndpointsConfigurer endpoints) {
        endpoints
                // 請求方式
                .allowedTokenEndpointRequestMethods(HttpMethod.GET, HttpMethod.POST)
                // 可重寫TokenEnhancer 自定生成令牌規則
                .tokenEnhancer(endpoints.getTokenEnhancer())
                // 用戶賬號密碼認證
                .userDetailsService(userDetailsService)
                // 指定認證管理器
                .authenticationManager(authenticationManager)
                // 是否重複使用 refresh_token
                .reuseRefreshTokens(false);
    }
    @Override
    public void configure(AuthorizationServerSecurityConfigurer oauthServer) {
        //是否允許客戶端使用form參數提交,不開啟則使用Authorization 要加在請求頭中,格式為 Basic 空格 base64(clientId:clientSecret)
        oauthServer.allowFormAuthenticationForClients();
    }
    /**
     * 配置客戶端詳情
     */
    @Override
    public void configure(ClientDetailsServiceConfigurer clients) throws Exception {
        clients.withClientDetails(sysClientDetailsService);
    }
}
使用流程
1.獲取token
2.使用access_token訪問/index
Authorization:bearer xxxx
其中xxxx為步驟1獲取的access_token
3.使用refresh_token獲取新的access_token
例子源碼
源碼為ruoyi2.0版本抽出部分代碼構建,新版本ruoyi已去掉oauth2的認證模式
https://gitee.com/MeiJM/spring-cram/tree/master/oauth2
參考資料
https://www.cnblogs.com/fengzheng/p/11724625.html
https://github.com/spring-projects/spring-security/wiki/OAuth-2.0-Migration-Guide
http://www.ruanyifeng.com/blog/2014/05/oauth_2_0.html