前言
本文由整體到局部的思路展開分析Arthas ByteKit 字節碼處理框架,結合類圖和數據流圖,介紹ByteKit字節碼處理流程及核心對象。
簡介
Arthas ByteKit 為新開發的字節碼工具庫,基於ASM提供更高層的字節碼處理能力,面向診斷/APM領域,不是通用的字節碼庫。ByteKit期望能提供一套簡潔的API,讓開發人員可以比較輕鬆的完成字節碼增強。
本文主要介紹以下幾點:
- ByteKit 基本用法
- ByteKit 字節碼處理流程
- 如何解析Interceptor Class
- ByteKit 字節碼核心處理邏輯
- LocationMatcher/Location的魔力
- @Binding 原理介紹
基本概念
首先介紹ByteKit的基本概念:
- Target class : 攔截的目標類,本文中為Sample類;
- Interceptor class : 用戶定義的攔截器類,定義了目標類的字節碼增強邏輯,本文為SampleInterceptor;
- ExceptionSuppressHandler : 攔截器使用的異常處理器,用於捕獲處理攔截方法意外拋出的異常;
- ClassNode/MethodNode : 通過Java asm 工具庫將二進制的class字節碼轉換成的結構化對象;
基本用法
為了理解起來更加清晰,對com.example.ByteKitDemo進行簡單修改,避免內部類造成的干擾,抽取幾個獨立類如下:
- SampleDemo: 測試入口類
- Sample: 要增強的目標類
- SampleInterceptor: Sample類的攔截器
- PrintExceptionSuppressHandler: 異常處理器
- EnhanceUtil: ByteKit 處理邏輯封裝
package com.example;

import com.alibaba.arthas.deps.org.objectweb.asm.tree.ClassNode;
import com.alibaba.arthas.deps.org.objectweb.asm.tree.MethodNode;
import com.taobao.arthas.bytekit.asm.MethodProcessor;
import com.taobao.arthas.bytekit.asm.binding.Binding;
import com.taobao.arthas.bytekit.asm.interceptor.InterceptorProcessor;
import com.taobao.arthas.bytekit.asm.interceptor.annotation.AtEnter;
import com.taobao.arthas.bytekit.asm.interceptor.annotation.AtExceptionExit;
import com.taobao.arthas.bytekit.asm.interceptor.annotation.AtExit;
import com.taobao.arthas.bytekit.asm.interceptor.annotation.ExceptionHandler;
import com.taobao.arthas.bytekit.asm.interceptor.parser.DefaultInterceptorClassParser;
import com.taobao.arthas.bytekit.utils.AgentUtils;
import com.taobao.arthas.bytekit.utils.AsmUtils;
import com.taobao.arthas.bytekit.utils.Decompiler;

import java.util.Arrays;
import java.util.List;


// 要攔截增強的目標類
class Sample {
    private int exceptionCount = 0;

    public String hello(String str, boolean exception) {
        if (exception) {
            exceptionCount++;
            throw new RuntimeException("test exception, str: " + str);
        }
        return "hello " + str;
    }
}

// Sample 類的攔截器
class SampleInterceptor {

    // 攔截方法Entry點進行處理
    @AtEnter(inline = false, suppress = RuntimeException.class, suppressHandler = PrintExceptionSuppressHandler.class)
    public static void atEnter(@Binding.This Object object,
                               @Binding.Class Object clazz,
                               @Binding.Args Object[] args,
                               @Binding.MethodName String methodName,
                               @Binding.MethodDesc String methodDesc) {
        System.out.println("atEnter, args[0]: " + args[0]);
    }

    // 攔截方法正常返回的語句,在返回前進行處理
    @AtExit(inline = true)
    public static void atExit(@Binding.Return Object returnObject) {
        System.out.println("atExit, returnObject: " + returnObject);
    }

    // 攔截方法內部拋出異常點
    @AtExceptionExit(inline = true, onException = RuntimeException.class)
    public static void atExceptionExit(@Binding.Throwable RuntimeException ex,
                                       @Binding.Field(name = "exceptionCount") int exceptionCount) {
        System.out.println("atExceptionExit, ex: " + ex.getMessage() + ", field exceptionCount: " + exceptionCount);
    }
}

// 異常處理器
class PrintExceptionSuppressHandler {

    @ExceptionHandler(inline = true)
    public static void onSuppress(@Binding.Throwable Throwable e, @Binding.Class Object clazz) {
        System.out.println("exception handler: " + clazz);
        e.printStackTrace();
    }
}

// ByteKit 處理邏輯封裝
class EnhanceUtil {

    public static byte[] enhanceClass(Class targetClass, String[] targetMethodNames, Class interceptorClass) throws Exception {
        // 初始化Instrumentation
        AgentUtils.install();

        // 解析定義的 Interceptor類 和相關的註解
        DefaultInterceptorClassParser interceptorClassParser = new DefaultInterceptorClassParser();
        List<InterceptorProcessor> processors = interceptorClassParser.parse(interceptorClass);

        // 加載字節碼
        ClassNode classNode = AsmUtils.loadClass(targetClass);

        List<String> methodNameList = Arrays.asList(targetMethodNames);

        // 對加載到的字節碼做增強處理
        for (MethodNode methodNode : classNode.methods) {
            if (methodNameList.contains(methodNode.name)) {
                MethodProcessor methodProcessor = new MethodProcessor(classNode, methodNode);
                for (InterceptorProcessor interceptor : processors) {
                    interceptor.process(methodProcessor);
                }
            }
        }

        // 獲取增強後的字節碼
        return AsmUtils.toBytes(classNode);
    }

}

//測試入口類
class SampleDemo {

    public static void main(String[] args) throws Exception {

        // 啟動Sample
        System.out.println("before retransform ...");
        try {
            Sample sample = new Sample();
            sample.hello("1", false);
            sample.hello("2", true);
        } catch (Exception e) {
            e.printStackTrace(System.out);
        }
        System.out.println();


        // 對Sample類的hello方法進行攔截處理,返回增強後的字節碼
        byte[] bytes = EnhanceUtil.enhanceClass(Sample.class, new String[]{"hello"}, SampleInterceptor.class);

        // 查看反編譯結果
        //System.out.println(Decompiler.decompile(bytes));

        // 通過 reTransform 增強類
        AgentUtils.reTransform(Sample.class, bytes);


        // 啟動Sample
        System.out.println("after retransform ...");
        try {
            Sample sample = new Sample();
            sample.hello("3", false);
            sample.hello("4", true);
        } catch (Exception e) {
            e.printStackTrace(System.out);
        }
    }

}
SampleInterceptor 攔截器類解析
// Sample 類的攔截器
class SampleInterceptor {

    // 攔截方法Entry點進行處理
    @AtEnter(inline = false, suppress = RuntimeException.class, suppressHandler = PrintExceptionSuppressHandler.class)
    public static void atEnter(@Binding.This Object object,
                               @Binding.Class Object clazz,
                               @Binding.Args Object[] args,
                               @Binding.MethodName String methodName,
                               @Binding.MethodDesc String methodDesc) {
        System.out.println("atEnter, args[0]: " + args[0]);
    }

    // 攔截方法正常返回的語句,在返回前進行處理
    @AtExit(inline = true)
    public static void atExit(@Binding.Return Object returnObject) {
        System.out.println("atExit, returnObject: " + returnObject);
    }

    // 攔截方法內部拋出異常點
    @AtExceptionExit(inline = true, onException = RuntimeException.class)
    public static void atExceptionExit(@Binding.Throwable RuntimeException ex,
                                       @Binding.Field(name = "exceptionCount") int exceptionCount) {
        System.out.println("atExceptionExit, ex: " + ex.getMessage() + ", field exceptionCount: " + exceptionCount);
    }
}- 在SampleInterceptor 中定義了3個攔截方法,分別標記攔截註解
@AtEnter/@AtExit/@AtExceptionExit; - 用
@Binding.Xxx註解綁定了不同的參數; - 在
@AtEnter裡配置了inline = false,在攔截點調用靜態攔截方法SampleInterceptor.atEnter(); - 在
@AtExit裡配置了inline = true,則表示將攔截方法SampleInterceptor.atExit()本身以inline方式展開到原方法中; -
@AtEnter配置了suppress = RuntimeException.class和suppressHandler = PrintExceptionSuppressHandler.class,說明插入的代碼會被try/catch包圍; -
@AtExceptionExit在原方法體範圍try-catch 指定異常進行處理。
@ExceptionHandler 解析:
在上面的 @AtEnter配置裡,生成的代碼會被 try/catch 包圍,那麼具體的內容是在PrintExceptionSuppressHandler裡。
將增強後的字節碼反編譯得到的代碼如下,為方便理解加上註釋:
   public String hello(String str, boolean exception) {

      // @AtEnter 原方法體之前插入攔截代碼:inline=false 調用攔截方法SampleInterceptor.atEnter()
      try {
         SampleInterceptor.atEnter(this, Sample.class, new Object[]{str, new Boolean(exception)}, "hello", "(Ljava/lang/String;Z)Ljava/lang/String;");
      } catch (RuntimeException var11) { // suppress 在攔截方法後插入try-catch指定異常

         // inline 展開suppressHandler (PrintExceptionSuppressHandler.class)
         Class var6 = Sample.class;
         System.out.println("exception handler: " + var6);
         var11.printStackTrace();
      }

      try {
         // 原hello方法處理邏輯
         if (exception) {// 66
            ++this.exceptionCount;// 67
            throw new RuntimeException("test exception, str: " + str);// 68
         } else {
            String var3 = "hello " + str;// 70

            // @AtExit return語句前插入inline 展開SampleInterceptor.atExit()方法內容
            System.out.println("atExit, returnObject: " + var3);
            // 原hello方法的return語句
            return var3;
         }
      } catch (RuntimeException var10) { // @AtExceptionExit 在原方法體範圍try-catch指定異常

         // inline 展開SampleInterceptor.atExceptionExit()方法內容
         int var9 = this.exceptionCount;
         System.out.println("atExceptionExit, ex: " + var10.getMessage() + ", field exceptionCount: " + var9);
         throw var10;
      }
   }
字節碼處理流程
asm字節碼處理流程:
目標類 class bytes -> ClassReader解析 -> ClassVisitor增強修改字節碼 -> ClassWriter生成增強後的 class bytes -> 通過Instrumentation解析加載為新的Class. 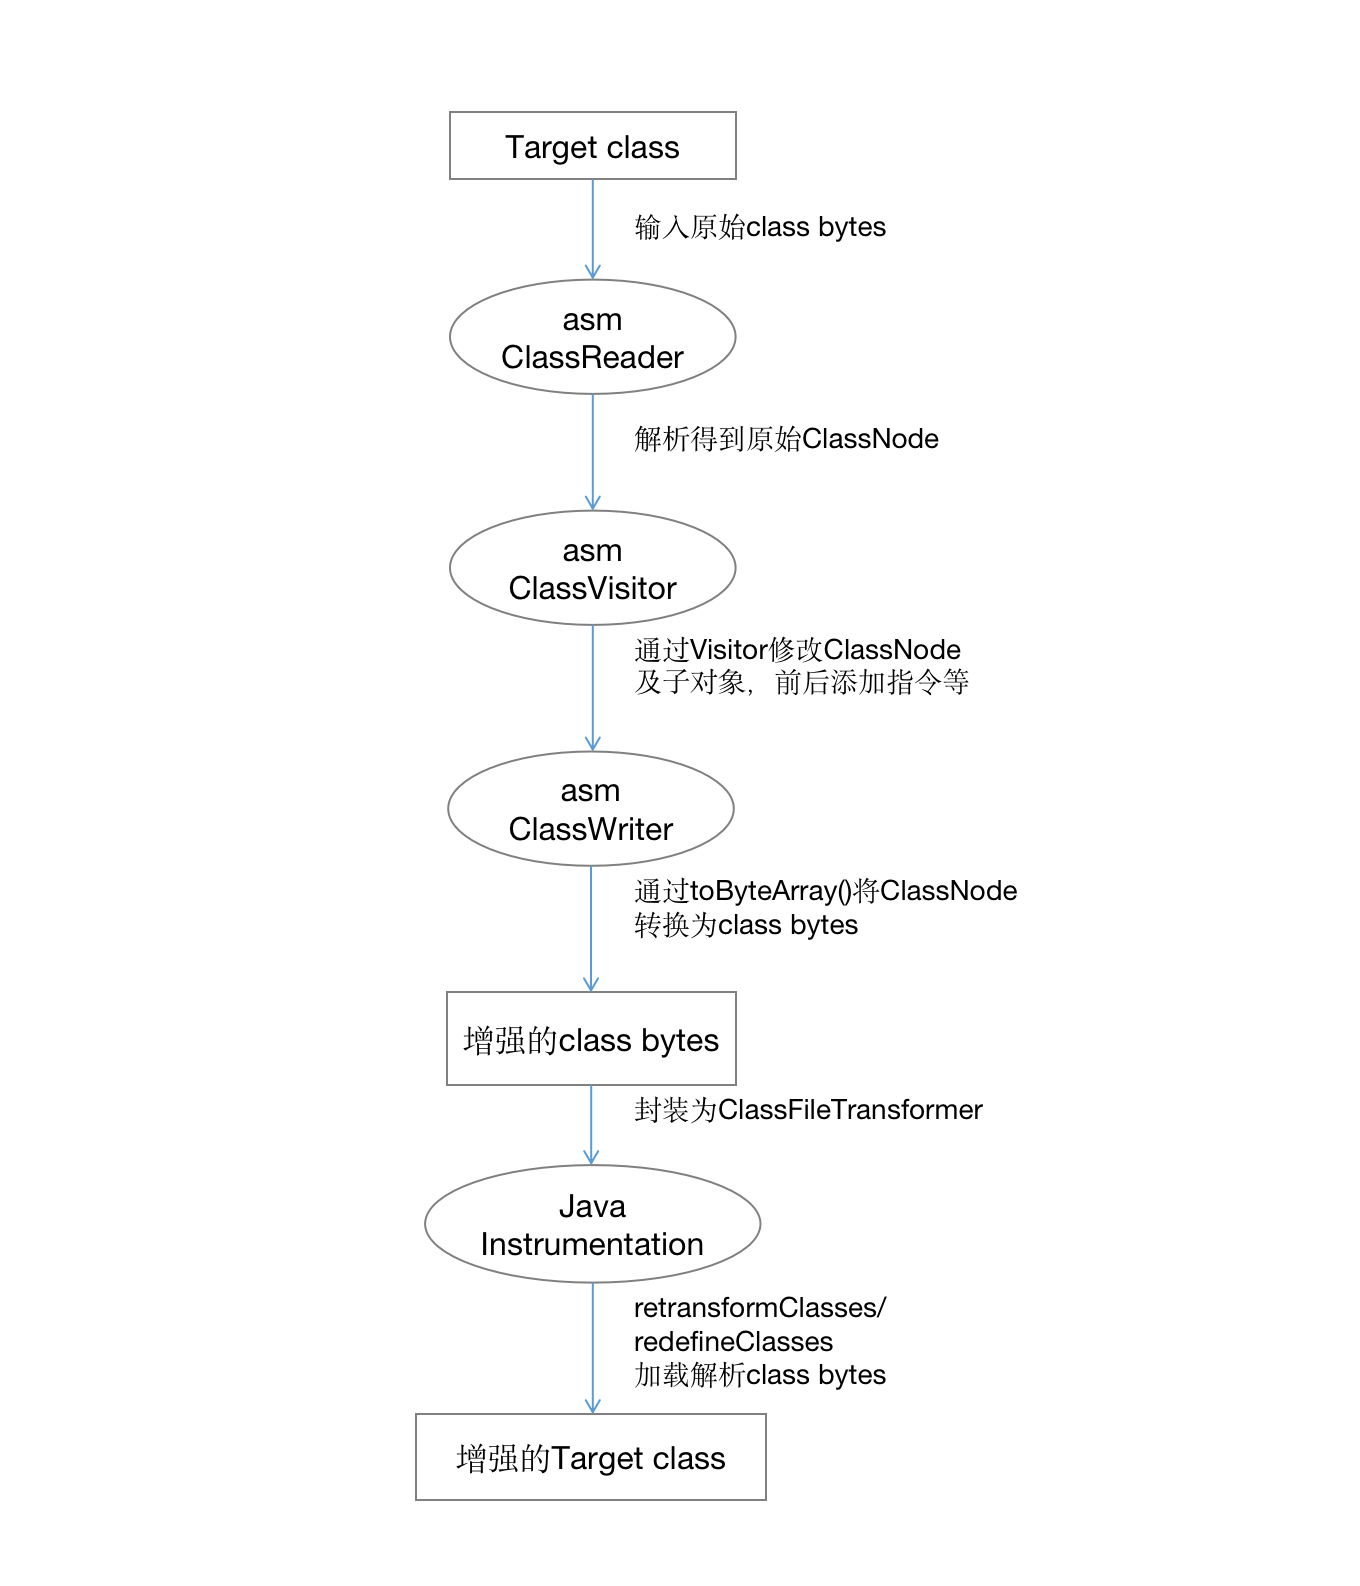
ByteKit 字節碼處理流程: 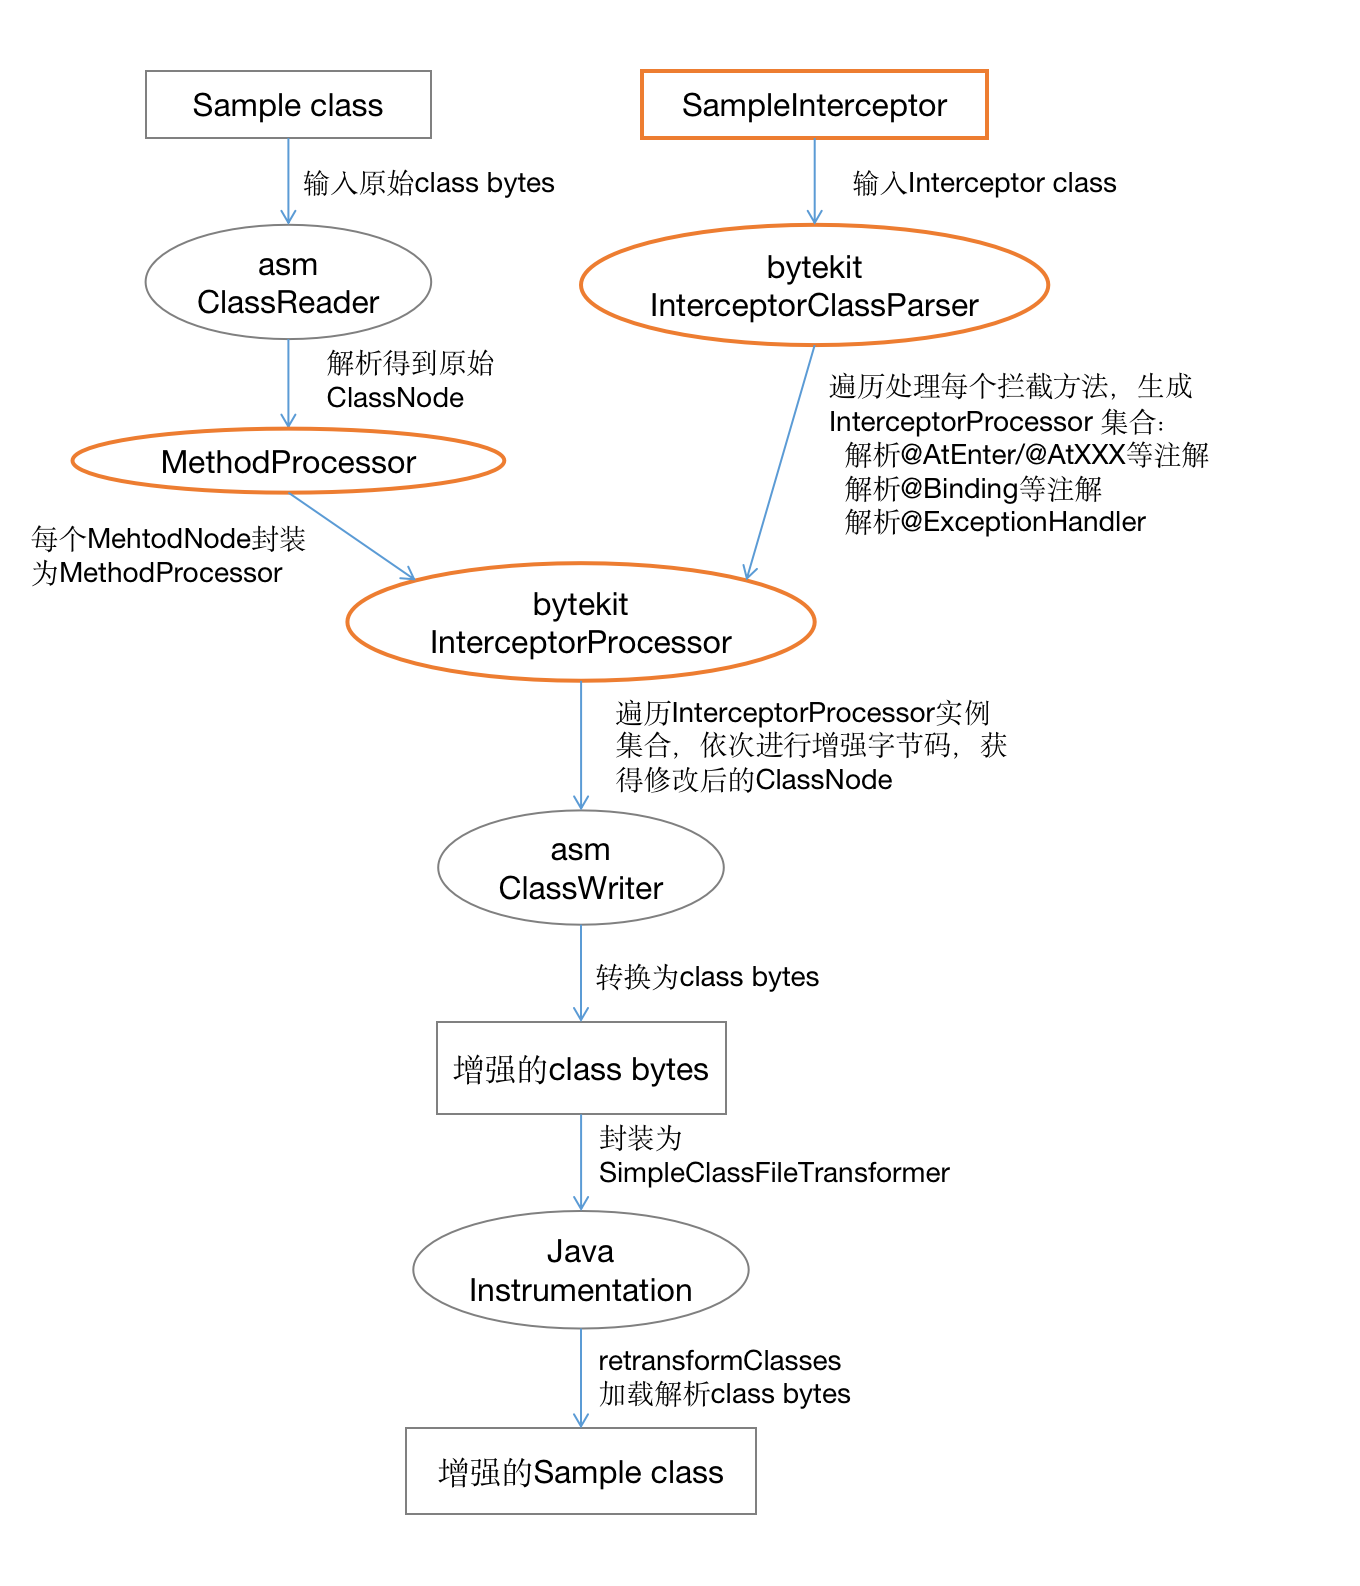
ByteKit對比asm的改進:
- 用戶只需要定義Interceptor class 及 Exception handler class,ByteKit自動將攔截方法的代碼以字節碼形式織入目標類,替代asm的ClassVisitor字節碼指令相關處理;
- Interceptor class 及 Exception handler class 完全是Java語法,不需要編寫任何Java 字節碼指令代碼,大幅降低使用門檻;
- Interceptor class 支持非常豐富的@AtXxx 代碼攔截點,除了常見的方法進入/退出/異常攔截點外,還包括行號/調用方法/訪問字段/同步塊等
- 支持豐富的@Binding 參數綁定,如this對象/Class/返回值/方法入參/局部變量/字段/調用方法的名稱/調用方法的參數/行號等
- 支持inline方式將攔截器的代碼內聯到目標方法中
- invokeOrigin技術,在原方法前後插入代碼,直接使用原方法的參數及局部變量!
其它特性,詳細內容可以參考ByteKit文檔。
從ByteKit的樣例代碼及上面的處理流程圖,我們得知Interceptor class 是最為關鍵的信息,包含了用戶定義的攔截處理邏輯。ByteKit 需要將Interceptor class 轉換為程序可以使用的描述性數據結構,然後根據這些描述數據修改目標類的字節碼。
ByteKit的主要處理步驟:
- 解析Interceptor Class的@AtXxx, @Binding等註解,生成InterceptorProcessor對象集合;
- 遍歷InterceptorProcessor集合,修改原方法的字節碼;
ByteKit 核心類圖
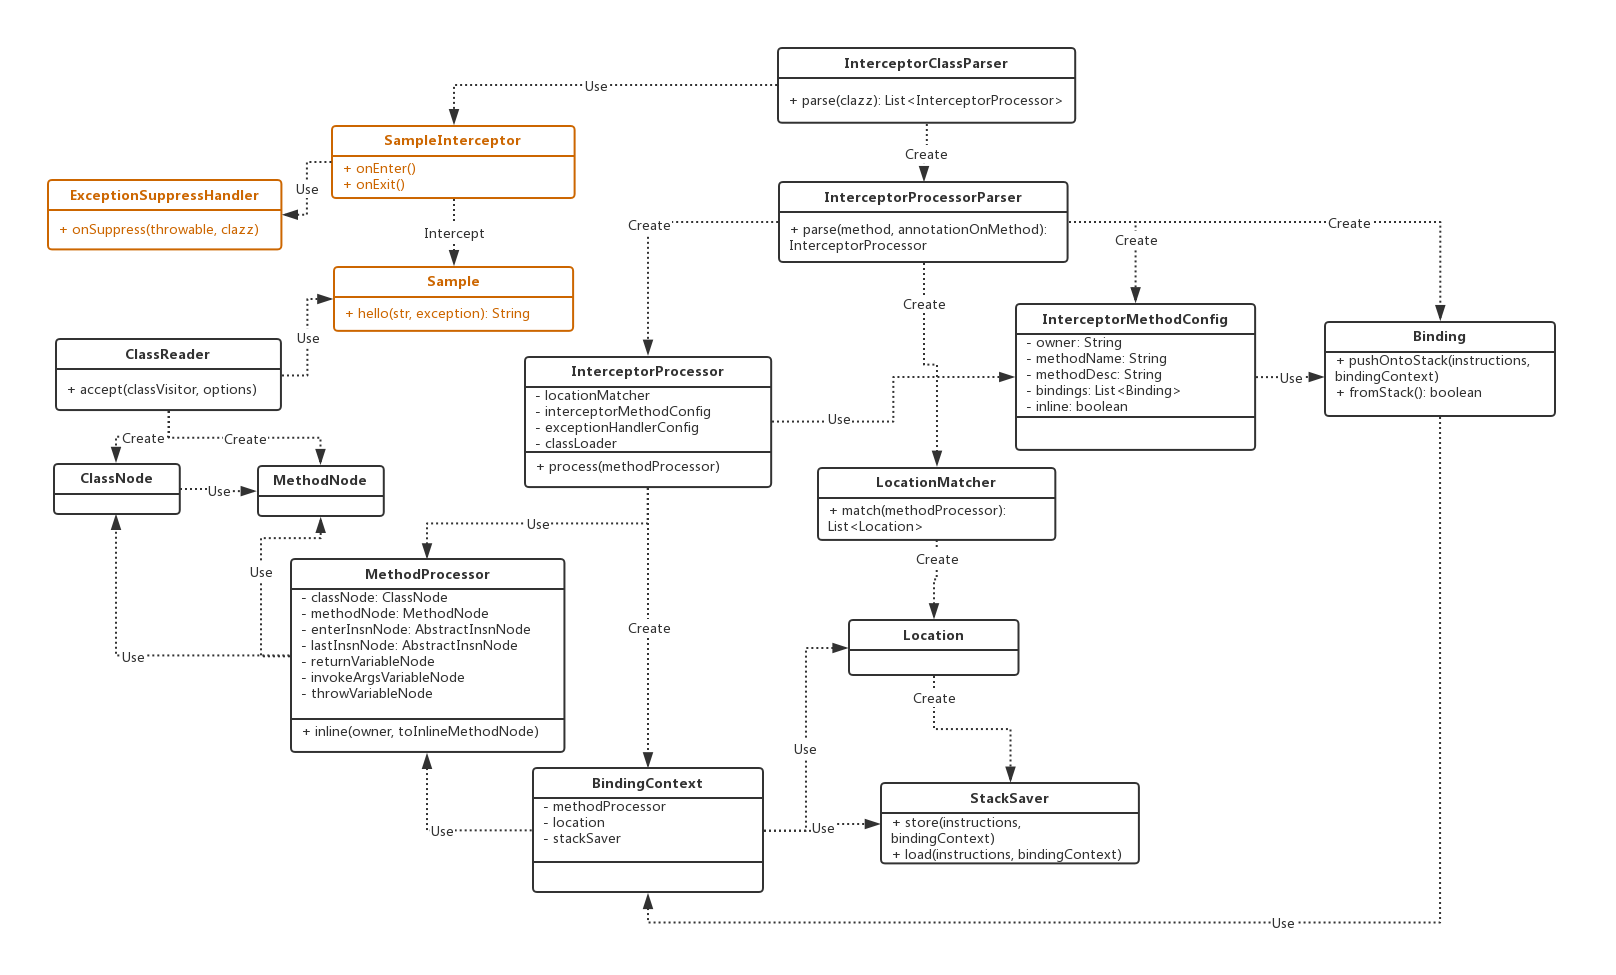
橙色的3個類是用戶定義的Target類和攔截器,上面已經進行說明。這裡列舉一下ByteKit核心類及其作用:
-
InterceptorClassParser: 攔截器(Interceptor)解析器,默認實現類為DefaultInterceptorClassParser。此類為攔截器解析入口,第一步分析攔截器的所有靜態方法,通過方法@AtXxx註解找到對應的InterceptorProcessorParser類進行下一步處理; -
InterceptorProcessorParser:@AtXxx註解的解析類,每個註解都有一個對應的Parser類。此類為攔截方法的核心解析類,生成InterceptorProcessor、LocationMatcher、InterceptorMethodConfig、Binding等對象; -
InterceptorProcessor: 攔截器字節碼處理類,也是用戶定義的攔截方法的解析結果,每一個攔截方法生成一個InterceptorProcessor實例; -
MethodProcessor: Target方法處理類,包含原始方法的ClassNode和MethodNode; -
InterceptorMethodConfig: 攔截方法的VO類,記錄了方法簽名及其Binding等信息;
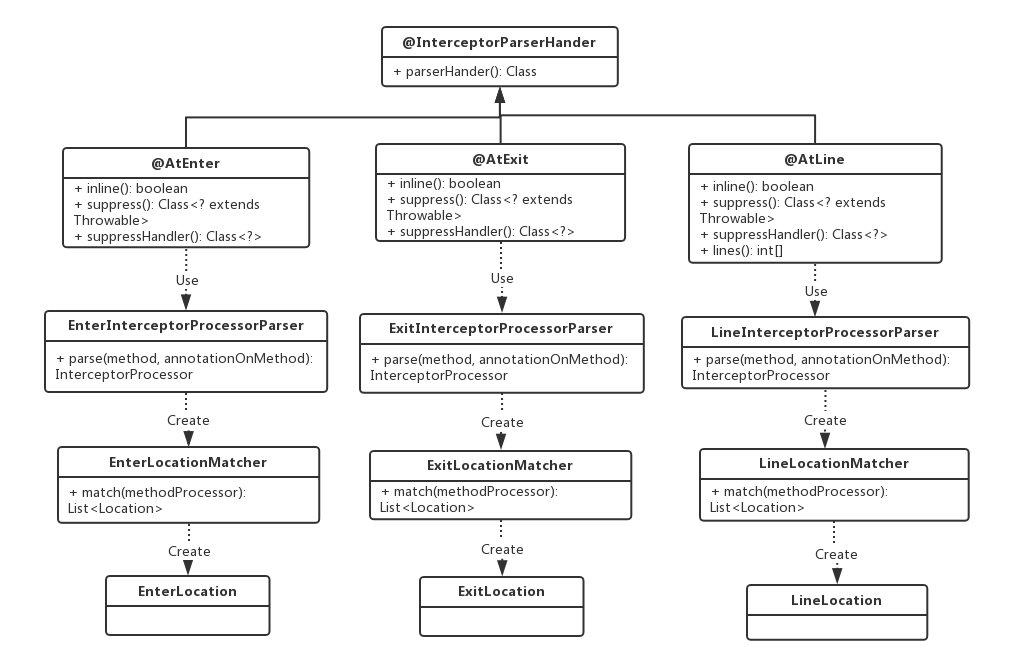
-
@AtXxx: 攔截點註解,標記在攔截方法上; -
LocationMatcher: 這是一個比較特殊的類,通過這個類獲得後面需要處理的指令的位置(Location),每個@AtXxx註解有一個對應的LocationMatcher子類; -
Location: 指令位置描述類,每個@AtXxx註解有對應的Location子類,描述對應的指令位置; -
StackSaver: 將棧數據保存到隱藏變量或者從隱藏局部變量加載到棧上。
-
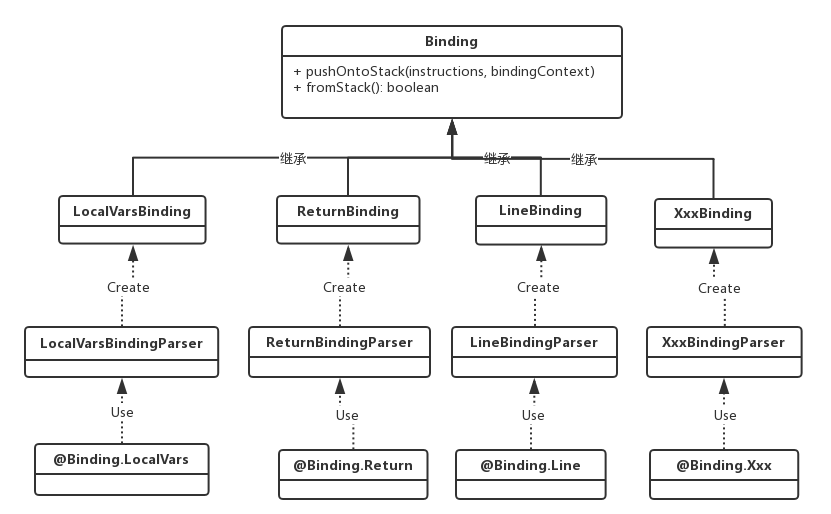
@Binding.Xxx: 攔截方法的參數綁定註解,按用戶定義的參數順序準備相應的數據到棧上; -
XxxBindingParser:@Binding.Xxx註解的解析類,生成對應的Binding子類; -
Binding: @Binding.Xxx 綁定註解的字節碼處理類,每個@Binding.Xxx有一個對應的Binding子類,負責@Binding.Xxx 參數的棧數據處理邏輯;
解析Interceptor Class
遍歷Interceptor 的靜態方法,解析每個方法上的@AtXxx註解和@Binding.Xxx註解,生成InterceptorProcessor對象。
public class DefaultInterceptorClassParser implements InterceptorClassParser {

    public List<InterceptorProcessor> parse(Class<?> clazz) {
        final List<InterceptorProcessor> result = new ArrayList<InterceptorProcessor>();

         // 攔截方法回調處理函數
        MethodCallback methodCallback = new MethodCallback() {

            @Override
            public void doWith(Method method) throws IllegalArgumentException, IllegalAccessException {
                 // 枚舉攔截方法標記的所有Annatation註解
                for (Annotation onMethodAnnotation : method.getAnnotations()) {
                    for (Annotation onAnnotation : onMethodAnnotation.annotationType().getAnnotations()) {
                         // 找到InterceptorParserHander的子類,即@AtXxx註解
                        if (InterceptorParserHander.class.isAssignableFrom(onAnnotation.annotationType())) {
                            // 判斷是否為靜態方法
                            if (!Modifier.isStatic(method.getModifiers())) {
                                throw new IllegalArgumentException("method must be static. method: " + method);
                            }

                            // 找到@AtXxx註解指定的parserHander類並實例化
                            InterceptorParserHander handler = (InterceptorParserHander) onAnnotation;
                            InterceptorProcessorParser interceptorProcessorParser = InstanceUtils
                                    .newInstance(handler.parserHander());

                            // 調用InterceptorProcessorParser.parse()解析攔截方法生成InterceptorProcessor對象
                            InterceptorProcessor interceptorProcessor = interceptorProcessorParser.parse(method,
                                    onMethodAnnotation);
                            result.add(interceptorProcessor);
                        }
                    }
                }
            }

        };

        //枚舉攔截器的所有方法
        ReflectionUtils.doWithMethods(clazz, methodCallback);

        return result;
    }
}
結合下面的@AtEnter註解進行理解:
@Documented
@Retention(RetentionPolicy.RUNTIME)
@java.lang.annotation.Target(ElementType.METHOD)
// parserHander屬性指定本註解的Parser類為EnterInterceptorProcessorParser.class
@InterceptorParserHander(parserHander = EnterInterceptorProcessorParser.class)
public @interface AtEnter {
    boolean inline() default true;

    Class<? extends Throwable> suppress() default None.class;

    Class<?> suppressHandler() default Void.class;

    class EnterInterceptorProcessorParser implements InterceptorProcessorParser {

        @Override
        public InterceptorProcessor parse(Method method, Annotation annotationOnMethod) {

            // 創建本註解的LocationMatcher實例:EnterLocationMatcher
            LocationMatcher locationMatcher = new EnterLocationMatcher();

            // 創建 InterceptorProcessor
            AtEnter atEnter = (AtEnter) annotationOnMethod;

            return InterceptorParserUtils.createInterceptorProcessor(method,
                    locationMatcher,
                    atEnter.inline(),
                    atEnter.suppress(),
                    atEnter.suppressHandler());

        }

    }
}
@Binding.Xxx解析過程與@AtXxx註解類似,這裡不再展開說明。
核心處理邏輯
上一小節主要講解Interceptor class的解析過程,本小節主要是講解ByteKit怎麼實現字節碼增強的核心邏輯。 InterceptorProcessor.process() 的字節碼處理核心邏輯如下:
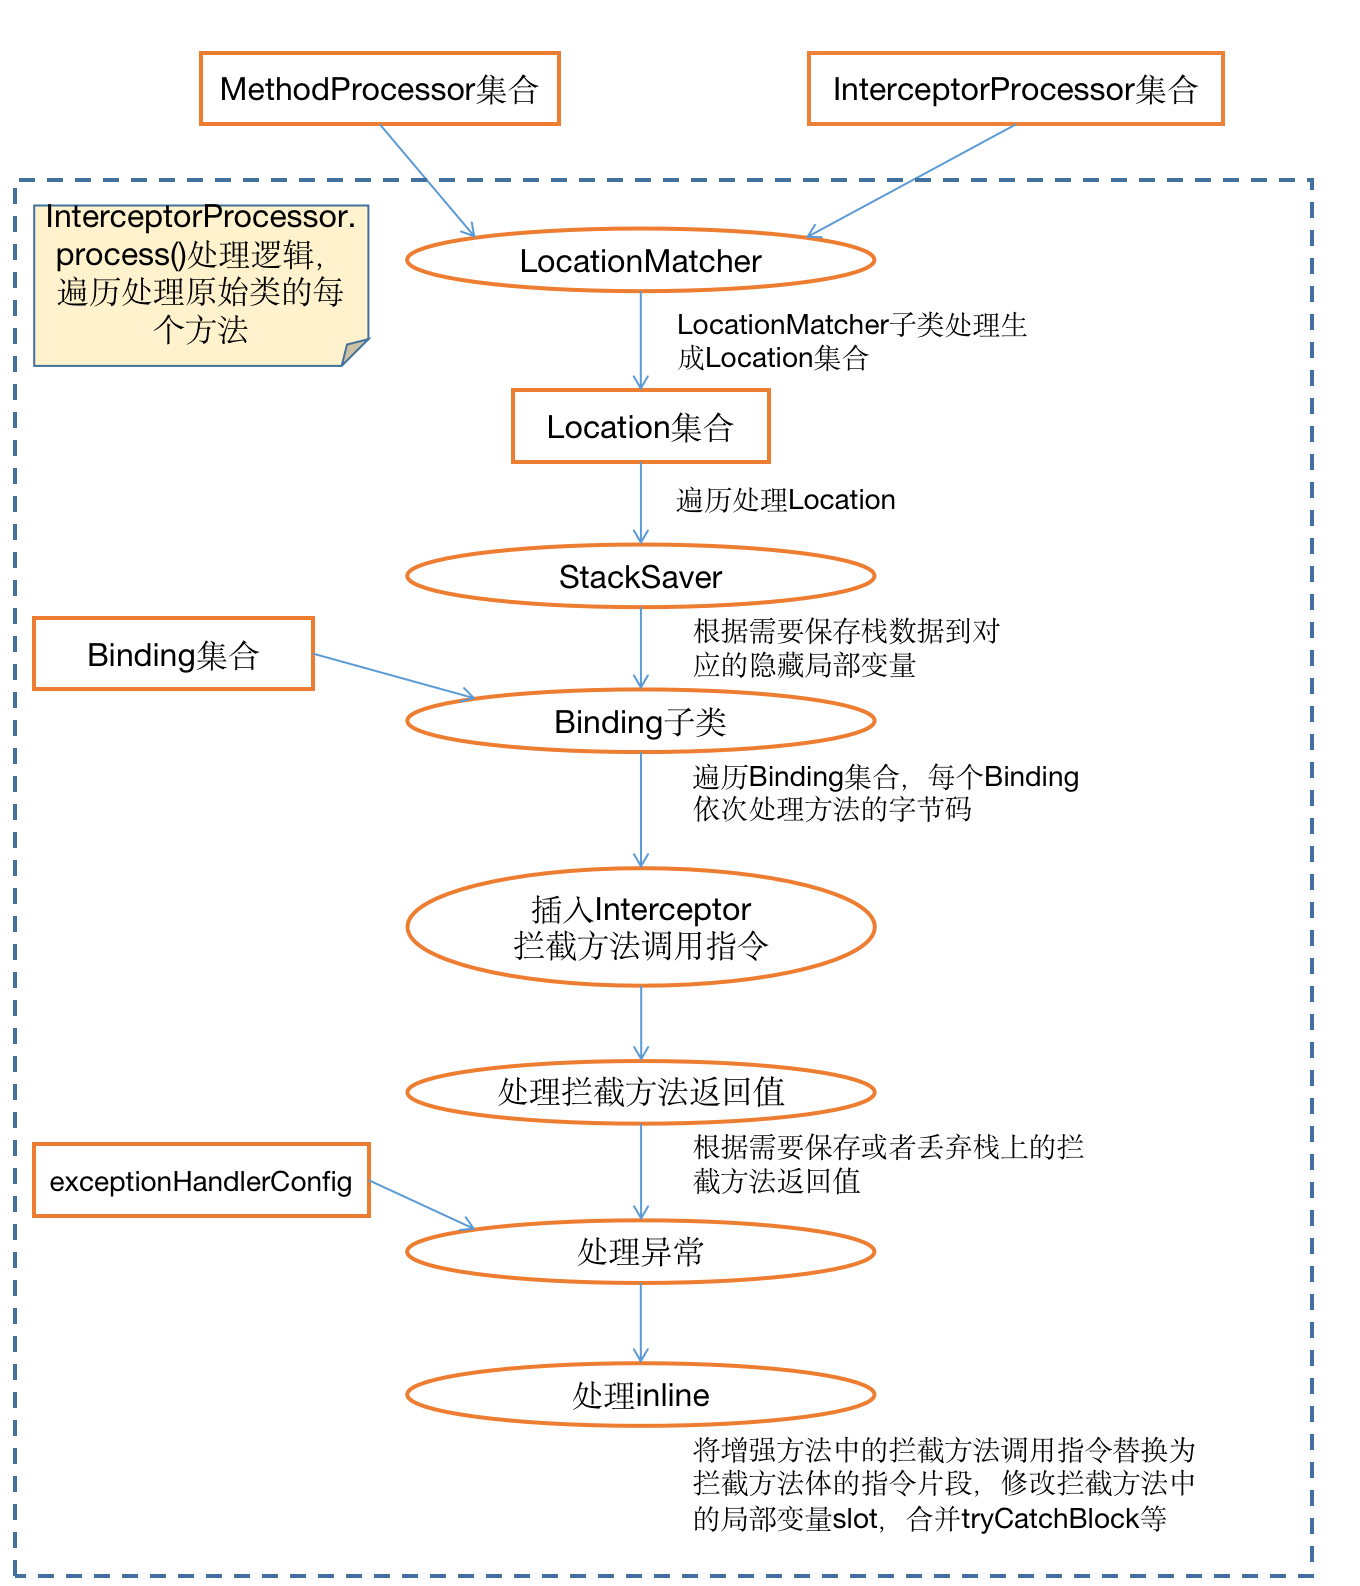
此方法為最主要的字節碼處理邏輯,這裡涉及到ByteKit核心的幾個字節碼處理類:
- MethodProcessor 實例是原始方法封裝對象,可以理解為原材料;
- 各種LocationMatcher、Binding子類可以理解為各種配件;
- InterceptorProcessor 實例可以理解為某個攔截方法的套件工具,對MethodProcessor進行處理後即完成了這個攔截方法的字節碼增強;
每個InterceptorProcessor實例的處理過程:
- 通過LocationMatcher計算得到Location集合;
- 遍歷Location集合進行處理;
- 根據需要使用StackSaver保存當前棧數據到隱藏變量,某些Binding會從隱藏變量加載數據;
- 遍歷處理Binding集合,本攔截方法的每個@Binding.Xxx參數都需要依次處理;
- 插入攔截方法調用指令,如SampleInterceptor.atEnter();
- 根據需要處理攔截方法的返回值,支持使用攔截方法返回值替換修改原方法return值或者丟棄多餘的攔截方法返回值;
- 攔截方法的supress異常處理;
- 如果攔截方法註解配置
inline=true,則展開攔截方法的內容,替換掉前面(5)插入的攔截方法調用指令; - 處理下一個Location;
LocationMatcher/Location 的魔力
學習ByteKit框架時,一直有一個問題困擾著我:
LocationMatcher/Location 這個是什麼?與@AtXxx註解有什麼關係?
單從字面理解LocationMatcher/Location有困難,那麼我們順著ByteKit處理字節碼的思路來推導一下。
ByteKit 處理流程與傳統asm ClassVisitor不同:
- ClassVisitor是在遍歷原始方法指令時修改插入新增的指令;
- ByteKit是遍歷Interceptor攔截方法,將每個攔截方法的增強邏輯應用於原始方法上;
兩者指令定位的差異:
- ClassVisitor在visitXxx方法中進行判斷是否遇到期望的指令,如方法調用指令、return指令等;
- ByteKit也需要定位每個攔截方法的開始指令,這個就是通過LocationMatcher來實現;
ByteKit 指令定位過程
1.解析Interceptor class生成定位規則
- 預處理解析Interceptor class時,沒有Target class的信息,不可能產生Target class相關的字節碼數據,所以此時ByteKit 生成了LocationMatcher實例和Binding實例。Binding是參數綁定的規則,LocationMatcher則是指令定位規則。
- 不同的攔截註解
@AtXxx的定位規則不同,所以會有對應的LocationMatcher子類;
2.通過定位規則計算定位點
- LocationMatcher 對MethodProcessor實例計算處理後,生成Location實例集合。Location 即指令定位點,記錄了當前攔截方法指令處理的
開始指令。 - 這裡體現了asm指令列表InsnList的雙向鏈表的妙處,通過某個指令可以很方便地前或者往後遍歷或者插入新的指令,即使這個指令前後多次修改插入其它指令,仍然可以正確定位!
問題答案: LocationMatcher 為攔截方法@AtXxx註解的定位規則,Location 為具體的指令定位點。
LocationMatcher分析
1.EnterLocationMatcher
將原始方法體開始的第一條有效指令enterInsnNode封裝為EnterLocation。
public class EnterLocationMatcher implements LocationMatcher {

    @Override
    public List<Location> match(MethodProcessor methodProcessor) {
        List<Location> locations = new ArrayList<Location>();
        AbstractInsnNode enterInsnNode = methodProcessor.getEnterInsnNode();

        LocationFilter locationFilter = methodProcessor.getLocationFilter();
        if (locationFilter.allow(enterInsnNode, LocationType.ENTER, true)) {
            EnterLocation enterLocation = new EnterLocation(enterInsnNode);
            locations.add(enterLocation);
        }
        return locations;
    }
}
2.ExitLocationMatcher
一個LocationMatcher可能計算產生多個Location實例,比如@AtExit的ExitLocationMatcher 會查找到原始方法中所有return指令,為每個return指令生成一個ExitLocation。
public class ExitLocationMatcher implements LocationMatcher {

    @Override
    public List<Location> match(MethodProcessor methodProcessor) {
        List<Location> locations = new ArrayList<Location>();
        AbstractInsnNode insnNode = methodProcessor.getEnterInsnNode();

        while (insnNode != null) {
            if (insnNode instanceof InsnNode) {
                InsnNode node = (InsnNode) insnNode;
                // 判斷是否某種return指令
                if (matchExit(node)) {
                    LocationFilter locationFilter = methodProcessor.getLocationFilter();
                    // 檢查是否為允許的Location,主要是防止重複增強字節碼
                    if (locationFilter.allow(node, LocationType.EXIT, false)) {
                    // 創建Location
                        ExitLocation ExitLocation = new ExitLocation(node);
                        locations.add(ExitLocation);
                    }
                }
            }
            insnNode = insnNode.getNext();
        }

        return locations;
    }

    public boolean matchExit(InsnNode node) {
        switch (node.getOpcode()) {
        case Opcodes.RETURN: // empty stack
        case Opcodes.IRETURN: // 1 before n/a after
        case Opcodes.FRETURN: // 1 before n/a after
        case Opcodes.ARETURN: // 1 before n/a after
        case Opcodes.LRETURN: // 2 before n/a after
        case Opcodes.DRETURN: // 2 before n/a after
            return true;
        }
        return false;
    }
}
@Binding 原理介紹
SampleInterceptor中通過@Binding.MethodName String methodName 綁定了方法名參數,在運行時這個methodName參數就真的被填充了數據,我們來看一下到底是怎麼實現這個呢?
public class MethodNameBinding extends Binding {

    @Override
    public void pushOntoStack(InsnList instructions, BindingContext bindingContext) {
        MethodProcessor methodProcessor = bindingContext.getMethodProcessor();
        AsmOpUtils.ldc(instructions, methodProcessor.getMethodNode().name);
    }

    @Override
    public Type getType(BindingContext bindingContext) {
        return Type.getType(String.class);
    }

}這個MethodNameBinding 實現邏輯挺簡單的,插入一條ldc method_name 指令就搞定了。
反編譯的代碼,第4個參數"hello"即是方法名稱:
SampleInterceptor.atEnter(this, Sample.class, new Object[]{str, new Boolean(exception)}, "hello", "(Ljava/lang/String;Z)Ljava/lang/String;");javap -v 查看字節碼:
23: ldc           #25                 // String hello
25: ldc           #26                 // String (Ljava/lang/String;Z)Ljava/lang/String;
27: invokestatic  #32                 // Method com/example/SampleInterceptor.atEnter:(Ljava/lang/Object;Ljava/lang/Object;[Ljava/lang/Object;Ljava/lang/String;Ljava/lang/String;)V
這裡涉及到方法調用指令invokestatic的使用方法:
Description: calls a static method
n is the number of arguments to the method
the long method name is really a path name, the name of the class,
the parenthesized argument list of the method called, and the return type.
Primitive types are represented by their capitalized first letter, ie I for an integer.
Constructors are path followed by ()V
Stack
| Before | After |
|---|---|
| arg n | returned value |
| ... | |
| arg 1 |
invokestatic 用於調用靜態方法,將方法的參數從左至右依次壓入棧,調用靜態方法時將全部參數彈出棧,然後將方法的返回值重新放入棧頂。
第23行 ldc #25 // String hello 的作用是加載常量表Constant pool中的#25常量壓入棧,這個常量就是字符串"hello"。下面是常量表:
Constant pool:
  #1 = Utf8               com/example/Sample
  #2 = Class              #1             // com/example/Sample
  ...
  #16 = Utf8               hello
  #17 = Utf8               (Ljava/lang/String;Z)Ljava/lang/String;
  ...
  #25 = String             #16            // hello
#26 = String #17 // (Ljava/lang/String;Z)Ljava/lang/String;簡單來說,在調用SampleInterceptor.atEnter攔截方法前,需要將它的參數依次入棧,調用攔截方法前的參數準備工作由Binding類完成,即Binding的作用就是將綁定參數的值依序放入棧中。
下面介紹幾種不同類型的參數綁定處理方式:
-
@Binding.MethodName String methodName這個綁定參數方法名為常量值,直接從常量表加載入棧即可。 -
@Binding.Args Object[] args這個綁定參數為攔截的目標方法的調用參數,則需要從方法的局部變量表LocalVariableTable中加載,並構造一個Object[]數組對象入棧,具體實現邏輯請查看《Arthas ByteKit 深度解讀(2):本地變量及參數綁定》。 -
@Binding.InvokeArgs Object[] invokeArgs這個綁定參數為目標方法中調用其它方法的參數列表,綁定的處理更加複雜,需要創建StackSaver處理棧數據保存及恢復。大概的處理流程:在調用某個方法前將當前棧數據保存起來,然後調用攔截方法,攔截方法返回之後需要恢復棧數據,最後調用原來的方法。
總結
本文介紹了Arthas ByteKit字節碼框架的基本原理,通過Interceptor class/@AtXxx註解/@Binding.Xxx註解等組件簡化了Java class字節碼增強的編碼邏輯,不需要編寫Java字節碼級別的處理代碼,大幅降低使用門檻。各種組件職責清晰,搭配使用靈活性高,可以滿足類似APM/Spy診斷等場景下的應用需要。