Ghost是一個基於Node.js開發的免費開源博客平臺,用於簡化個人博客和在線出版物的在線發佈過程。本文介紹了部署Ghost博客的詳細步驟。
背景信息
隨著業務的擴展,您可以使用阿里雲強大的產品平臺,平滑地橫向和縱向擴展服務容量,例如:
- 擴展單個ECS實例的CPU和內存規格,增強服務器的處理能力。
- 增加多臺ECS實例,並利用負載均衡,在多個實例中進行負載的均衡分配。
- 利用彈性伸縮(Auto Scaling),根據業務量自動增加或減少ECS實例的數量。
- 利用對象存儲OSS(Object Storage Service),存儲靜態網頁和海量圖片、視頻等。
本文檔介紹如何使用一臺基本配置的雲服務器ECS實例搭建Ghost。適用於初次使用阿里雲進行建站的個人用戶。
步驟一:創建Linux實例
對於個人使用的小型網站,一臺ECS實例可以滿足基本需求。具體通過阿里雲活動中購買ECS,創建一臺Linux實例。
在配置參數時,您需要注意以下幾點:
- 實例:對於個人網站,實例規格為1 核 2GB或2 核 4GB就能滿足基本需求。關於實例規格的詳細介紹,請參見實例規格族。
- 網絡:選擇專有網絡。
- 公網帶寬:如果選擇0 MB,則不分配外網 IP,該實例將無法訪問公網。如果您選擇了按使用流量,同時選擇0 MB固定帶寬,則同樣不分配外網 IP,而且不支持0 MB帶寬升級,因此請謹慎選擇。
- 鏡像:如果用於建站,可以選擇公共鏡像中的 Linux 操作系統,例如:CentOS。
實例創建完成後,您會收到短信和郵件通知,告知您的實例名稱、公網IP地址、內網IP地址等信息。您可以使用這些信息登錄並管理實例。
很多重要的信息都是通過綁定手機的短信接收,並且重要的操作(例如重啟、停止等)都需要手機接收驗證碼,因此請務必保持綁定手機通信暢通。
步驟二:部署Web環境
本節以安裝Nginx為例介紹如何部署Web環境。
軟件包中包含的軟件及版本為:nginx/1.10.2
說明 這是寫文檔時參見的軟件版本。您下載的版本可能與此不同。
部署Web環境之前,請確認以下信息:
- 您的實例可以連接公網。
- 已安裝用於連接Linux實例的工具,例如:SecureCRT。本節將以這個工具為例介紹操作步驟。
完成以下操作,部署Web環境:
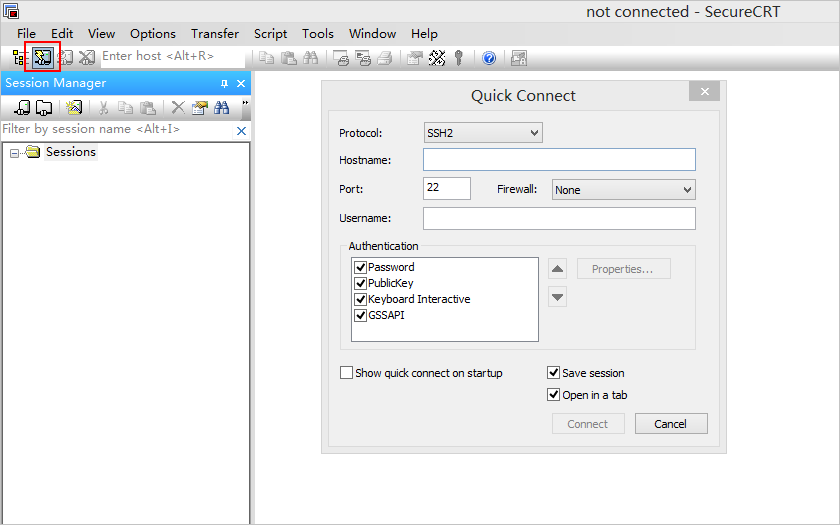
- 打開SecureCRT ,設置登錄實例所需的信息。
- 設置連接名稱。
- 協議選擇SSH。
- 輸入主機IP地址和用戶。
- 單擊確定保存。
- 輸入用戶名root和登錄密碼。
- 添加Nginx軟件庫。
[root@localhost ~]#rpm -Uvh http://nginx.org/packages/centos/7/noarch/RPMS/nginx-release-centos-7-0.el7.ngx.noarch.rpm - 安裝Nginx。
[root@localhost ~]#yum -y install nginx - 設置Nginx服務器自動啟動。
[root@localhost ~]# systemctl enable nginx.service - 啟動Nginx並查看Nginx服務狀態。
[root@localhost ~]#systemctl start nginx.service
[root@localhost ~]#systemctl status nginx.service - 在瀏覽器中輸入IP地址,可以看到默認的Nginx網頁。


至此,Nginx搭建完成。
步驟三:安裝Ghost
完成以下操作,安裝Ghost:
- 請從https://ghost.org/zip/ghost-latest.zip下載最新版的Ghost安裝包。
- 更新系統。確保您的服務器系統處於最新狀態。
[root@localhost ~]# yum -y update -
安裝Node.js。
- 安裝EPEL。
[root@localhost ~]# yum install epel-release -y - 安裝Node.js和npm。
[root@localhost ~]# yum install nodejs npm --enablerepo=epel - 安裝進程管理器以便控制Node.js應用程序。這個進程管理器可以保持應用程序一直處於運行狀態。
[root@localhost ~]# npm install pm2 -g - 安裝後運行
node -v和npm -v命令檢查Node.js的版本。
- 安裝EPEL。
-
安裝Ghost。
<ol id="substeps-fmv-qao-jt8"><li id="substep-pjs-5qj-h8v"><a href="https://www.aliyun.com/minisite/goods?userCode=nd0gfumn" target="_blank">創建Ghost安裝目錄。 </a> <pre class="has" id="codeblock-l08-nn2-uau"><code>[root@localhost ~]# mkdir -p /var/www/ghost</code></pre> </li><li id="substep-m8h-sei-2bl"><a href="https://www.aliyun.com/minisite/goods?userCode=nd0gfumn" target="_blank">進入Ghost安裝目錄,下載最新版本的Ghost安裝包。 </a> <pre class="has" id="codeblock-yhi-jgk-vvk"><code>[root@localhost ~]# cd /var/www/ghost[root@localhost ghost]# curl -L https://ghost.org/zip/ghost-latest.zip -o ghost.zip
-
解壓Ghost安裝包。
[root@localhost ghost]# yum install unzip -y
[root@localhost ghost]# unzip ghost.zip -
使用npm安裝Ghost。
[root@localhost ghost]# npm install -production -
安裝完成後運行
npm start命令啟動Ghost,檢查是否安裝成功。 -
從示例配置文件config.example.js複製並新建Ghost配置文件config.js。
<pre class="has" id="codeblock-htr-xmc-07z"><code>[root@localhost ghost]# cp config.example.js config.js</code></pre> </li><li id="substep-que-88w-xxl"><a href="https://www.aliyun.com/minisite/goods?userCode=nd0gfumn" target="_blank">配置config.js文件中的URL為Ghost博客的域名。 </a> <pre class="has" id="codeblock-0c7-5un-klg"><code>[root@localhost ghost]# vim config.js</code></pre> <br /><a href="http://static-aliyun-doc.oss-cn-hangzhou.aliyuncs.com/assets/img/9768/156533583212477_zh-CN.png"><img alt="修改域名" class="has" id="image-ew4-2sg-ysv" src="https://imgconvert.csdnimg.cn/aHR0cDovL3N0YXRpYy1hbGl5dW4tZG9jLm9zcy1jbi1oYW5nemhvdS5hbGl5dW5jcy5jb20vYXNzZXRzL2ltZy85NzY4LzE1NjUzMzU4MzIxMjQ3N196aC1DTi5wbmc?x-oss-process=image/format,png" /></a></li><li id="substep-s77-21b-vew"><a href="https://www.aliyun.com/minisite/goods?userCode=nd0gfumn" target="_blank">使用進程管理器配置Ghost處於永久運行狀態。 </a> <pre class="has" id="codeblock-yih-off-8hr"><code>[root@localhost ghost]# NODE_ENV=production pm2 start index.js --name "ghost"</code></pre> </li><li id="substep-0o1-y6b-ekd"><a href="https://www.aliyun.com/minisite/goods?userCode=nd0gfumn" target="_blank">開啟/停止/重啟ghost。 </a> <pre class="has" id="codeblock-1un-5x2-4cc"><code>[root@localhost ghost]# pm2 start ghost[root@localhost ghost]# pm2 stop ghost
[root@localhost ghost]# pm2 restart ghost
- 添加Nginx軟件庫。
[root@localhost ~]# rpm -Uvh http://nginx.org/packages/centos/7/noarch/RPMS/nginx-release-centos-7-0.el7.ngx.noarch.rpm - 安裝Nginx。
[root@localhost ~]# yum -y install nginx - 設置Nginx服務器自動啟動。
[root@localhost ~]# systemctl enable nginx.service - 啟動Nginx並查看Nginx服務狀態。
[root@localhost ~]#systemctl start nginx.service
[root@localhost ~]#systemctl status nginx.service - 在瀏覽器中輸入IP地址,可以看到默認的Nginx的網頁。

- 進入Nginx配置目錄,新建Ghost博客的Nginx配置文件。
[root@localhost ~]#vim /etc/nginx/conf.d/ghost.conf - 將以下內容輸入到ghost.conf中,把server_name改成實際的域名。
- 修改默認的配置文件default.conf為default.conf.bak,使Nginx只應用於ghost.conf。
[root@localhost ~]#mv default.conf default.conf.bak - 重啟Nginx服務。
[root@localhost conf.d]# systemctl restart nginx.service

<ol id="substeps-3u6-4hz-d73"><li id="substep-0fb-6hq-861">在瀏覽器輸入http://IP或http://域名即可訪問Ghost。<a href="http://static-aliyun-doc.oss-cn-hangzhou.aliyuncs.com/assets/img/9768/156533583312480_zh-CN.png"><img alt="Ghost網頁" class="has" id="image-1cp-ss7-ksh" src="https://imgconvert.csdnimg.cn/aHR0cDovL3N0YXRpYy1hbGl5dW4tZG9jLm9zcy1jbi1oYW5nemhvdS5hbGl5dW5jcy5jb20vYXNzZXRzL2ltZy85NzY4LzE1NjUzMzU4MzMxMjQ4MF96aC1DTi5wbmc?x-oss-process=image/format,png" /></a> <p><strong>說明</strong> 如果訪問出現502,請檢查是否是防火牆的問題,可以關閉防火牆。</p> </li><li id="substep-v2n-cq1-v6j">如果需要對博客進行編輯修改,在瀏覽器輸入http://IP/ghost即可。 <p><br /><a href="http://static-aliyun-doc.oss-cn-hangzhou.aliyuncs.com/assets/img/9768/156533583312481_zh-CN.png"><img alt="修改博客" class="has" id="image-9oa-s4u-2ji" src="https://imgconvert.csdnimg.cn/aHR0cDovL3N0YXRpYy1hbGl5dW4tZG9jLm9zcy1jbi1oYW5nemhvdS5hbGl5dW5jcy5jb20vYXNzZXRzL2ltZy85NzY4LzE1NjUzMzU4MzMxMjQ4MV96aC1DTi5wbmc?x-oss-process=image/format,png" /></a></p> </li></ol></li></ol>步驟四:購買域名
您可以給自己的網站設定一個單獨的域名。這樣您的用戶可以使用易記的域名訪問您的網站,而不需要使用複雜的IP地址。
建議登錄阿里雲購買域名。
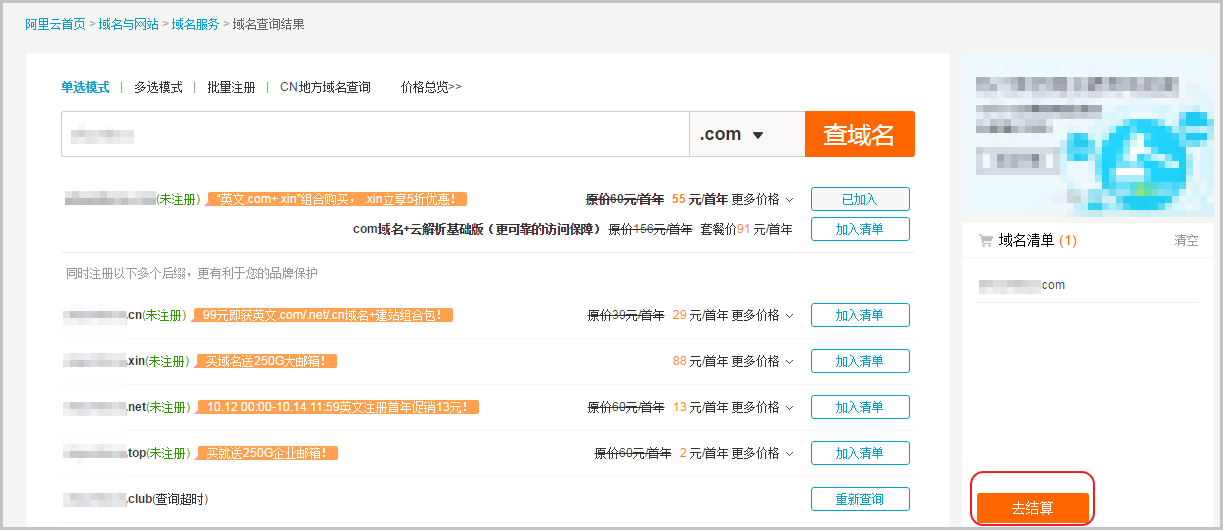
- 在購買域名頁面,搜索您需要的域名,如尚未被註冊,則可以購買。選擇要購買的域名及期限,然後結算。
- 在確認訂單的時候,需要選擇您的域名的所有者。
為方便操作,建議暫時先選擇個人,以後可以在會員中心進行修改。本文以個人用戶為例。
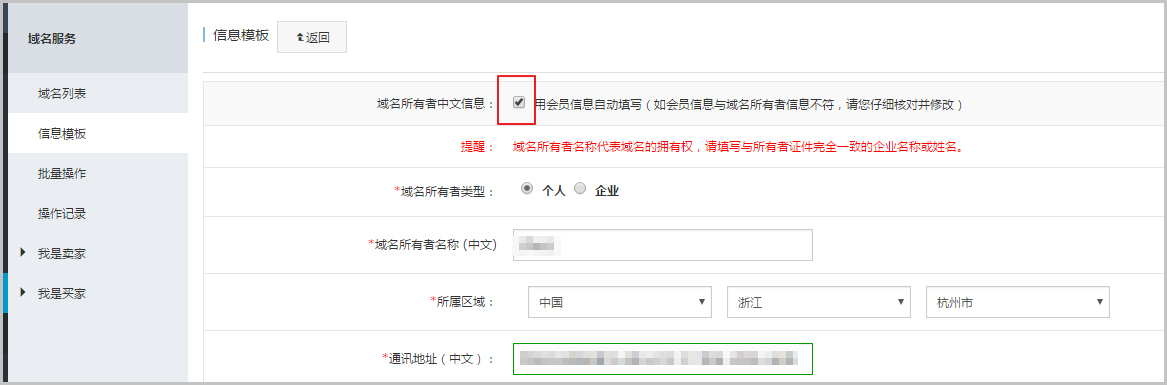
- 如果這是您首次購買域名,需要創建消息模板。
- 選擇用會員信息自動填寫。請務必填寫真實信息。
- 填寫完成後需要進行實名認證。上傳個人身份證正面掃描件。審核一般需要3~5個工作日。


步驟五:備案
對於域名指向中國境內服務器的網站,必須進行網站備案。在域名獲得備案號之前,網站是無法開通使用的。
阿里雲有代備案系統,方便您進行備案。備案免費,審核時間一般為20天左右,請您耐心等待。
- 登錄備案管理控制檯。
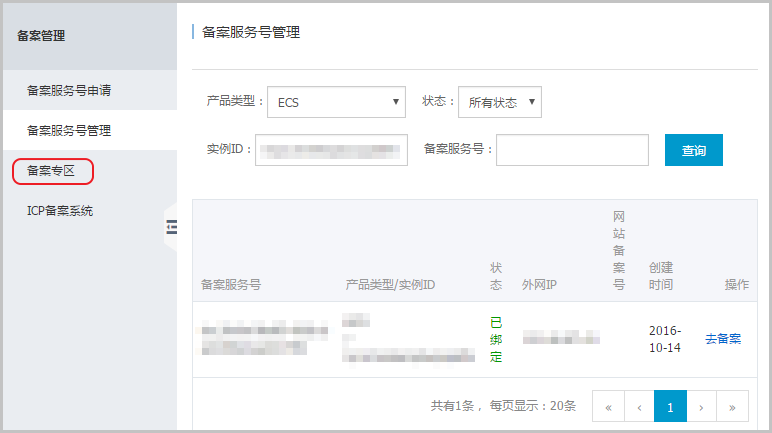
- 在左側導航欄,單擊備案管理 > 備案服務號申請,然後單擊申請,為購買的ECS實例申請備案服務號,此服務號在備案時會用到。
- 在彈出的提示信息對話框中,單擊確定。
- 申請成功後,頁面自動跳轉到備案服務號管理頁面,顯示與 ECS 實例綁定的備案號。然後單擊備案專區,瞭解備案相關信息。
- 首次備案的用戶,需要在ICP代備案管理系統註冊一個備案賬號。
說明 該備案賬號不是阿里雲賬號,而是申請備案專用的賬號。
關於首次備案的詳細步驟,請參見首次備案。

步驟六:配置域名解析
您需要在阿里雲萬網上配置域名解析之後,用戶才能通過域名訪問您的網站。
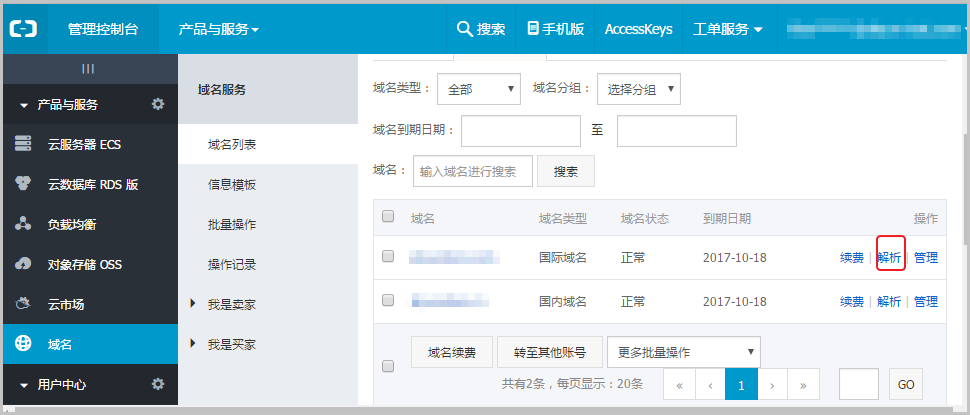
- 登錄域名管理控制檯。
- 在左側導航欄,單擊域名 > 域名列表。在域名列表中找到要解析的域名,在操作列 ,單擊解析。
- 單擊新手引導設置。
- 在文本框內輸入您的 Linux 實例的公網 IP 地址,單擊提交。
設置成功,會出現如下信息。
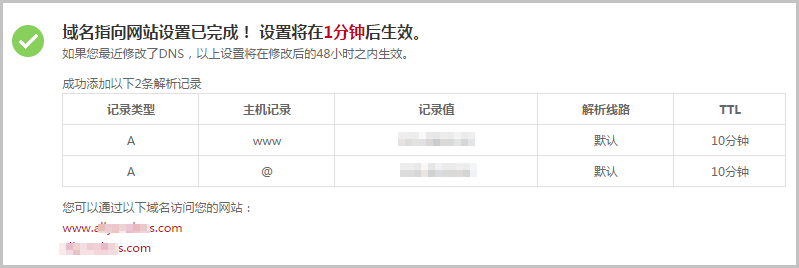
恭喜您!您可以使用域名訪問自己的網站了!