思維導圖

文章已收錄Github精選,歡迎Star:https://github.com/yehongzhi/learningSummary
概述
一個優秀的框架肯定離不開各種設計模式的運用,Spring框架也不例外。因為網上很多文章比較散亂,所以想總結一下在Spring中用到的設計模式,希望大家看完之後能對spring有更深層次的理解。
工廠模式
工廠模式我們都知道是把創建對象交給工廠,以此來降低類與類之間的耦合。工廠模式在Spring中的應用非常廣泛,這裡舉的例子是ApplicationContext和BeanFactory,這也是Spring的IOC容器的基礎。
首先看BeanFactory,這是最底層的接口。
public interface BeanFactory {
    Object getBean(String name) throws BeansException;

    <T> T getBean(String name, @Nullable Class<T> requiredType) throws BeansException;

    Object getBean(String name, Object... args) throws BeansException;

    <T> T getBean(Class<T> requiredType) throws BeansException;

    <T> T getBean(Class<T> requiredType, Object... args) throws BeansException;
    //省略...
}
ApplicationContext則是擴展類,也是一個接口,他的作用是當容器啟動時,一次性創建所有的bean。
public interface ApplicationContext extends EnvironmentCapable, ListableBeanFactory, HierarchicalBeanFactory,
MessageSource, ApplicationEventPublisher, ResourcePatternResolver {
@Nullable
String getId();
String getApplicationName();
String getDisplayName();
long getStartupDate();
@Nullable
ApplicationContext getParent();
AutowireCapableBeanFactory getAutowireCapableBeanFactory() throws IllegalStateException;
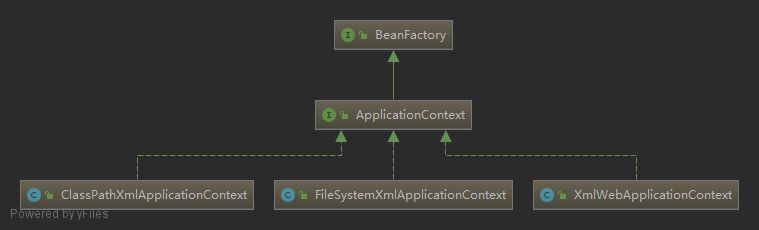
}ApplicationContext有三個實現類,分別是:
- ClassPathXmlApplication:從類路徑ClassPath中尋找指定的XML配置文件,找到並裝載ApplicationContext的實例化工作。
- FileSystemXMLApplicationContext:從指定的文件系統路徑中尋找指定的XML配置文件,找到並裝載ApplicationContext的實例化工作。
- XMLWebApplicationContext:從Web系統中的XML文件載入Bean定義的信息,Web應用尋找指定的XML配置文件,找到並裝載完成ApplicationContext的實例化工作。
因此這幾個類的關係我們清楚了,類圖就是這樣:
在哪裡初始化呢,這講起來有些複雜,就不展開細講,提一下。主要看AbstractApplicationContext類的refresh()方法。
@Override
public void refresh() throws BeansException, IllegalStateException {
    synchronized (this.startupShutdownMonitor) {
        //省略...
        try {
            //省略...
            //初始化所有的單實例 Bean(沒有配置賴加載的)
            finishBeanFactoryInitialization(beanFactory);
        }catch (BeansException ex) {
            //省略...
        }finally {
            //省略...
        }
    }
}
單例模式
在系統中,有很多對象我們都只需要一個,比如線程池、Spring的上下文對象,日誌對象等等。單例模式的好處在於對一些重量級的對象,省略了創建對象花費的時間,減少了系統的開銷,第二點是使用單例可以減少new操作的次數,減少了GC線程回收內存的壓力。
實際上,在Spring中的Bean默認的作用域就是singleton(單例)的。如何實現的呢?
主要看DefaultSingletonBeanRegistry的getSingleton()方法:
public class DefaultSingletonBeanRegistry extends SimpleAliasRegistry implements SingletonBeanRegistry {
    /** 保存單例Objects的緩存集合ConcurrentHashMap,key:beanName --> value:bean實例 */
    private final Map<String, Object> singletonObjects = new ConcurrentHashMap<>(256);

    public Object getSingleton(String beanName, ObjectFactory<?> singletonFactory) {
        Assert.notNull(beanName, "Bean name must not be null");
        synchronized (this.singletonObjects) {
            //檢查緩存中是否有實例,如果緩存中有實例,直接返回
            Object singletonObject = this.singletonObjects.get(beanName);
            if (singletonObject == null) {
                //省略...
                try {
                    //通過singletonFactory獲取單例
                    singletonObject = singletonFactory.getObject();
                    newSingleton = true;
                }
                //省略...
                if (newSingleton) {
                    addSingleton(beanName, singletonObject);
                }
            }
            //返回實例
            return singletonObject;
        }
    }

    protected void addSingleton(String beanName, Object singletonObject) {
      synchronized (this.singletonObjects) {
        this.singletonObjects.put(beanName, singletonObject);
        this.singletonFactories.remove(beanName);
        this.earlySingletonObjects.remove(beanName);
        this.registeredSingletons.add(beanName);
      }
    }
}
從源碼中可以看出,是通過ConcurrentHashMap的方式,如果在Map中存在則直接返回,如果不存在則創建,並且put進Map集合中,並且整段邏輯是使用同步代碼塊包住的,所以是線程安全的。
策略模式
策略模式,簡單來說就是封裝好一組策略算法,外部客戶端根據不同的條件選擇不同的策略算法解決問題。這在很多框架,還有日常開發都會用到的一種設計模式。在Spring中,我這裡舉的例子是Resource類,這是所有資源訪問類所實現的接口。
針對不同的訪問資源的方式,Spring定義了不同的Resource類的實現類。我們看一張類圖:
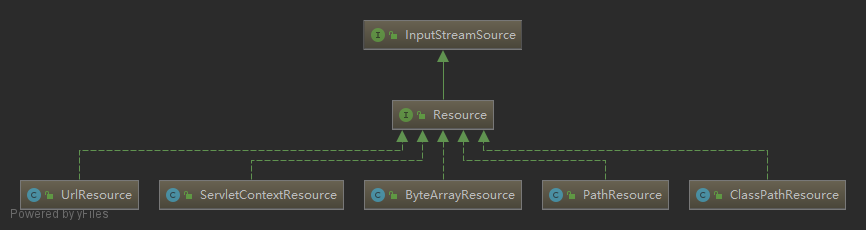
簡單介紹一下Resource的實現類:
- UrlResource:訪問網絡資源的實現類。
- ServletContextResource:訪問相對於 ServletContext 路徑裡的資源的實現類。
- ByteArrayResource:訪問字節數組資源的實現類。
- PathResource:訪問文件路徑資源的實現類。
- ClassPathResource:訪問類加載路徑裡資源的實現類。
寫一段偽代碼來示範一下Resource類的使用:
@RequestMapping(value = "/resource", method = RequestMethod.GET)
public String resource(@RequestParam(name = "type") String type,
                       @RequestParam(name = "arg") String arg) throws Exception {
    Resource resource;
    //這裡可以優化為通過工廠模式,根據type創建Resource的實現類
    if ("classpath".equals(type)) {
        //classpath下的資源
        resource = new ClassPathResource(arg);
    } else if ("file".equals(type)) {
        //本地文件系統的資源
        resource = new PathResource(arg);
    } else if ("url".equals(type)) {
        //網絡資源
        resource = new UrlResource(arg);
    } else {
        return "fail";
    }
    InputStream is = resource.getInputStream();
    ByteArrayOutputStream os = new ByteArrayOutputStream();
    int i;
    while ((i = is.read()) != -1) {
        os.write(i);
    }
    String result = new String(os.toByteArray(), StandardCharsets.UTF_8);
    is.close();
    os.close();
    return "type:" + type + ",arg:" + arg + "\r\n" + result;
}
這就是策略模式的思想,通過外部條件使用不同的算法解決問題。其實很簡單,因為每個實現類的getInputStream()方法都不一樣,我們看ClassPathResource的源碼,是通過類加載器加載資源:
public class ClassPathResource extends AbstractFileResolvingResource {

    private final String path;

    @Nullable
    private ClassLoader classLoader;

    @Nullable
    private Class<?> clazz;

    @Override
    public InputStream getInputStream() throws IOException {
        InputStream is;
        //通過類加載器加載類路徑下的資源
        if (this.clazz != null) {
            is = this.clazz.getResourceAsStream(this.path);
        }
        else if (this.classLoader != null) {
            is = this.classLoader.getResourceAsStream(this.path);
        }
        else {
            is = ClassLoader.getSystemResourceAsStream(this.path);
        }
        //如果輸入流is為null,則報錯
        if (is == null) {
            throw new FileNotFoundException(getDescription() + " cannot be opened because it does not exist");
        }
        //返回InputStream
        return is;
    }
}
再看UrlResource的源碼,獲取InputStream的實現又是另一種策略。
public class UrlResource extends AbstractFileResolvingResource {
    @Nullable
    private final URI uri;

    private final URL url;

    private final URL cleanedUrl;

    @Override
    public InputStream getInputStream() throws IOException {
        //獲取連接
        URLConnection con = this.url.openConnection();
        ResourceUtils.useCachesIfNecessary(con);
        try {
            //獲取輸入流,並返回
            return con.getInputStream();
        }
        catch (IOException ex) {
            // Close the HTTP connection (if applicable).
            if (con instanceof HttpURLConnection) {
                ((HttpURLConnection) con).disconnect();
            }
            throw ex;
        }
    }
}
代理模式
Spring除了IOC(控制反轉)之外的另一個核心就是AOP(面向切面編程)。AOP能夠將與業務無關的,卻被業務模塊所共同調用的邏輯(比如日誌,權限控制等等)封裝起來,減少系統重複代碼,降低系統之間的耦合,有利於系統的維護和擴展。
Spring AOP主要是基於動態代理實現的,如果要代理的類,實現了某個接口,則使用JDK動態代理,如果沒有實現接口則使用Cglib動態代理。
我們看DefaultAopProxyFactory的createAopProxy()方法,Spring通過此方法創建動態代理類:
public class DefaultAopProxyFactory implements AopProxyFactory, Serializable {
    @Override
    public AopProxy createAopProxy(AdvisedSupport config) throws AopConfigException {
        if (config.isOptimize() || config.isProxyTargetClass() || hasNoUserSuppliedProxyInterfaces(config)) {
            Class<?> targetClass = config.getTargetClass();
            if (targetClass == null) {
                throw new AopConfigException("TargetSource cannot determine target class: " + "Either an interface or a target is required for proxy creation.");
            }
            if (targetClass.isInterface() || Proxy.isProxyClass(targetClass)) {
                return new JdkDynamicAopProxy(config);
            }
            return new ObjenesisCglibAopProxy(config);
        }
        else {
            return new JdkDynamicAopProxy(config);
        }
    }
}
JDK動態代理和Cglib動態代理的區別:
- JDK動態代理只能對實現了接口的類生成代理,沒有實現接口的類不能使用。
- Cglib動態代理即使被代理的類沒有實現接口,也可以使用,因為Cglib動態代理是使用繼承被代理類的方式進行擴展。
- Cglib動態代理是通過繼承的方式,覆蓋被代理類的方法來進行代理,所以如果方法是被final修飾的話,就不能進行代理。
從源碼中可以看出,Spring會先判斷是否實現了接口,如果實現了接口就使用JDK動態代理,如果沒有實現接口則使用Cglib動態代理,也可以通過配置,強制使用Cglib動態代理,配置如下:
<aop:aspectj-autoproxy proxy-target-class="true"/>模板模式
模板模式在Spring中用得太多了,它定義一個算法的骨架,而將一些步驟延遲到子類中。 一般定義一個抽象類為骨架,子類重寫抽象類中的模板方法實現算法骨架中特定的步驟。模板模式可以不改變一個算法的結構即可重新定義該算法的某些特定步驟。
Spring中的事務管理器就運用模板模式的設計,首先看PlatformTransactionManager類。這是最底層的接口,定義提交和回滾的方法。
public interface PlatformTransactionManager {
    TransactionStatus getTransaction(@Nullable TransactionDefinition definition) throws TransactionException;

    void commit(TransactionStatus status) throws TransactionException;

    void rollback(TransactionStatus status) throws TransactionException;
}
毫無意外,使用了抽象類作為骨架,接著看AbstractPlatformTransactionManager類。
@Override
public final void commit(TransactionStatus status) throws TransactionException {
    //省略...
    DefaultTransactionStatus defStatus = (DefaultTransactionStatus) status;
    if (defStatus.isLocalRollbackOnly()) {
        //省略...
        //調用processRollback()
        processRollback(defStatus, false);
        return;
    }

    if (!shouldCommitOnGlobalRollbackOnly() && defStatus.isGlobalRollbackOnly()) {
        //省略...
        //調用processRollback()
        processRollback(defStatus, true);
        return;
    }
    //調用processCommit()
    processCommit(defStatus);
}

//這個方法定義了骨架,裡面會調用一個doRollback()的模板方法
private void processRollback(DefaultTransactionStatus status, boolean unexpected) {
    if (status.hasSavepoint()) {
        //省略...
    }
    else if (status.isNewTransaction()) {
        //調用doRollback()模板方法
        doRollback(status);
    }
    else {
        //省略...
    }
    //省略了很多代碼...
}

private void processCommit(DefaultTransactionStatus status) throws TransactionException {
    //省略...
    if (status.hasSavepoint()) {
        //省略...
    }
    else if (status.isNewTransaction()) {
        //省略...
        //調用doCommit()模板方法
        doCommit(status);
    }
    else if (isFailEarlyOnGlobalRollbackOnly()) {
        unexpectedRollback = status.isGlobalRollbackOnly();
    }
    //省略了很多代碼...
}

//模板方法doRollback(),把重要的步驟延遲到子類去實現
protected abstract void doRollback(DefaultTransactionStatus status) throws TransactionException;

//模板方法doCommit(),把重要的步驟延遲到子類去實現
protected abstract void doCommit(DefaultTransactionStatus status) throws TransactionException;
模板方法則由各種事務管理器的實現類去實現,也就是把骨架中重要的doRollback()延遲到子類。一般來說,Spring默認是使用的事務管理器的實現類是DataSourceTransactionManager。
//通過繼承AbstractPlatformTransactionManager抽象類
public class DataSourceTransactionManager extends AbstractPlatformTransactionManager
        implements ResourceTransactionManager, InitializingBean {
    //重寫doCommit()方法,實現具體commit的邏輯
    @Override
    protected void doCommit(DefaultTransactionStatus status) {
        DataSourceTransactionObject txObject = (DataSourceTransactionObject) status.getTransaction();
        Connection con = txObject.getConnectionHolder().getConnection();
        if (status.isDebug()) {
            logger.debug("Committing JDBC transaction on Connection [" + con + "]");
        }
        try {
            con.commit();
        }
        catch (SQLException ex) {
            throw new TransactionSystemException("Could not commit JDBC transaction", ex);
        }
    }

    //重寫doRollback()方法,實現具體的rollback的邏輯
    @Override
    protected void doRollback(DefaultTransactionStatus status) {
    DataSourceTransactionObject txObject = (DataSourceTransactionObject) status.getTransaction();
    Connection con = txObject.getConnectionHolder().getConnection();
    if (status.isDebug()) {
      logger.debug("Rolling back JDBC transaction on Connection [" + con + "]");
    }
    try {
      con.rollback();
    }
    catch (SQLException ex) {
      throw new TransactionSystemException("Could not roll back JDBC transaction", ex);
    }
  }
}
如果你是用Hibernate框架,Hibernate也有自身的實現,這就體現了設計模式的開閉原則,通過繼承或者組合的方式進行擴展,而不是直接修改類的代碼。Hibernate的事務管理器則是HibernateTransactionManager。
public class HibernateTransactionManager extends AbstractPlatformTransactionManager
        implements ResourceTransactionManager, BeanFactoryAware, InitializingBean {

  //重寫doCommit()方法,實現Hibernate的具體commit的邏輯
  @Override
  protected void doCommit(DefaultTransactionStatus status) {HibernateTransactionObject txObject = (HibernateTransactionObject) status.getTransaction();
      Transaction hibTx = txObject.getSessionHolder().getTransaction();
      Assert.state(hibTx != null, "No Hibernate transaction");
      if (status.isDebug()) {
        logger.debug("Committing Hibernate transaction on Session [" +
            txObject.getSessionHolder().getSession() + "]");
      }
      try {
        hibTx.commit();
      }
      catch (org.hibernate.TransactionException ex) {
        throw new TransactionSystemException("Could not commit Hibernate transaction", ex);
      }
          //省略...
    }

  //重寫doRollback()方法,實現Hibernate的具體rollback的邏輯
  @Override
  protected void doRollback(DefaultTransactionStatus status) {
    HibernateTransactionObject txObject = (HibernateTransactionObject) status.getTransaction();
    Transaction hibTx = txObject.getSessionHolder().getTransaction();
    Assert.state(hibTx != null, "No Hibernate transaction");
    //省略...
    try {
      hibTx.rollback();
    }
    catch (org.hibernate.TransactionException ex) {
      throw new TransactionSystemException("Could not roll back Hibernate transaction", ex);
    }
        //省略...
    finally {
      if (!txObject.isNewSession() && !this.hibernateManagedSession) {
        txObject.getSessionHolder().getSession().clear();
      }
    }
  }
}
其實模板模式在日常開發中也經常用,比如一個方法中,前後代碼都一樣,只有中間有一部分操作不同,就可以使用模板模式進行優化代碼,這可以大大地減少冗餘的代碼,非常實用。
適配器模式與責任鏈模式
適配器模式是一種結構型設計模式, 它能使接口不兼容的對象能夠相互合作,將一個類的接口,轉換成客戶期望的另外一個接口。
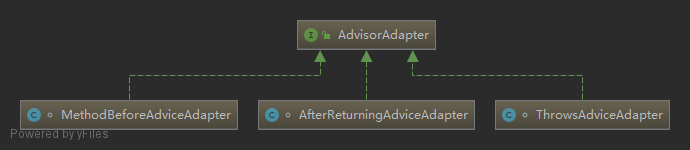
在SpringAOP中有一個很重要的功能就是使用的 Advice(通知) 來增強被代理類的功能,Advice主要有MethodBeforeAdvice、AfterReturningAdvice、ThrowsAdvice這幾種。每個Advice都有對應的攔截器,如下所示:
Spring需要將每個 Advice 都封裝成對應的攔截器類型返回給容器,所以需要使用適配器模式對 Advice 進行轉換。對應的就有三個適配器,我們看個類圖:
適配器在Spring中是怎麼把通知類和攔截類進行轉換的呢,我們先看適配器的接口。定義了兩個方法,分別是supportsAdvice()和getInterceptor()。
public interface AdvisorAdapter {
    //判斷通知類是否匹配
    boolean supportsAdvice(Advice advice);
    //傳入通知類,返回對應的攔截類
    MethodInterceptor getInterceptor(Advisor advisor);
}
其實很簡單,可以看出轉換的方法就是getInterceptor(),通過supportsAdvice()進行判斷。我們看前置通知的適配器的實現類MethodBeforeAdviceAdapter。
class MethodBeforeAdviceAdapter implements AdvisorAdapter, Serializable {
    //判斷是否匹配MethodBeforeAdvice通知類
    @Override
    public boolean supportsAdvice(Advice advice) {
        return (advice instanceof MethodBeforeAdvice);
    }
    //傳入MethodBeforeAdvice,轉換為MethodBeforeAdviceInterceptor攔截類
    @Override
    public MethodInterceptor getInterceptor(Advisor advisor) {
        MethodBeforeAdvice advice = (MethodBeforeAdvice) advisor.getAdvice();
        return new MethodBeforeAdviceInterceptor(advice);
    }
}
getInterceptor()方法中,調用了對應的攔截類的構造器創建對應的攔截器返回,傳入通知類advice作為參數。接著我們看攔截器MethodBeforeAdviceInterceptor。
public class MethodBeforeAdviceInterceptor implements MethodInterceptor, Serializable {
  //成員變量,通知類
  private MethodBeforeAdvice advice;

  //定義了有參構造器,外部通過有參構造器創建MethodBeforeAdviceInterceptor
  public MethodBeforeAdviceInterceptor(MethodBeforeAdvice advice) {
      Assert.notNull(advice, "Advice must not be null");
      this.advice = advice;
  }

  //當調用攔截器的invoke方法時,就調用通知類的before()方法,實現前置通知
  @Override
  public Object invoke(MethodInvocation mi) throws Throwable {
      //調用通知類的before()方法,實現前置通知
      this.advice.before(mi.getMethod(), mi.getArguments(), mi.getThis() );
      return mi.proceed();
  }

}
那麼在哪裡初始化這些適配器呢,我們看DefaultAdvisorAdapterRegistry()。
public class DefaultAdvisorAdapterRegistry implements AdvisorAdapterRegistry, Serializable {

  private final List<AdvisorAdapter> adapters = new ArrayList<>(3);

  public DefaultAdvisorAdapterRegistry() {
    //初始化適配器,添加到adapters集合,也就是註冊
    registerAdvisorAdapter(new MethodBeforeAdviceAdapter());
    registerAdvisorAdapter(new AfterReturningAdviceAdapter());
    registerAdvisorAdapter(new ThrowsAdviceAdapter());
  }

  @Override
  public void registerAdvisorAdapter(AdvisorAdapter adapter) {
    this.adapters.add(adapter);
  }

    //獲取所有的攔截器
    @Override
    public MethodInterceptor[] getInterceptors(Advisor advisor) throws UnknownAdviceTypeException {
        List<MethodInterceptor> interceptors = new ArrayList<>(3);
        Advice advice = advisor.getAdvice();
        if (advice instanceof MethodInterceptor) {
            interceptors.add((MethodInterceptor) advice);
        }
        //遍歷adapters集合
        for (AdvisorAdapter adapter : this.adapters) {
            //調用supportsAdvice()方法,判斷入參的advisor是否有匹配的適配器
            if (adapter.supportsAdvice(advice)) {
                //如果匹配,則調用getInterceptor()轉換成對應的攔截器,添加到interceptors集合中
                interceptors.add(adapter.getInterceptor(advisor));
            }
        }
        if (interceptors.isEmpty()) {
            throw new UnknownAdviceTypeException(advisor.getAdvice());
        }
        //返回攔截器集合
        return interceptors.toArray(new MethodInterceptor[0]);
    }

}
適配器模式在這裡就是把通知類轉為攔截類,轉為攔截類之後,就添加到攔截器集合中。添加到攔截器集合之後,就用到了責任鏈模式,在ReflectiveMethodInvocation類被調用,我們看JDK動態代理JdkDynamicAopProxy的invoke()方法。
@Override
@Nullable
public Object invoke(Object proxy, Method method, Object[] args) throws Throwable {
    MethodInvocation invocation;
    //這裡就是獲取攔截器集合,最後就會調用到上文說的getInterceptors()
    List<Object> chain = this.advised.getInterceptorsAndDynamicInterceptionAdvice(method, targetClass);
    if (chain.isEmpty()) {
        //省略...
    }else {
        //創建一個MethodInvocation
        invocation = new ReflectiveMethodInvocation(proxy, target, method, args, targetClass, chain);
        //調用proceed()方法,底層會通過指針遍歷攔截器集合,然後實現前置通知等功能
        retVal = invocation.proceed();
    }
    //省略...
}
最後就在ReflectiveMethodInvocation裡調用proceed()方法,proceed()方法是一個遞歸的方法,通過指針控制遞歸的結束。這是很典型的責任鏈模式。
public class ReflectiveMethodInvocation implements ProxyMethodInvocation, Cloneable {
    protected final List<?> interceptorsAndDynamicMethodMatchers;
    //指針
    private int currentInterceptorIndex = -1;

    protected ReflectiveMethodInvocation(Object proxy, @Nullable Object target, Method method, @Nullable Object[] arguments, @Nullable Class<?> targetClass, List<Object> interceptorsAndDynamicMethodMatchers) {
        //省略...
        //攔截器的集合
        this.interceptorsAndDynamicMethodMatchers = interceptorsAndDynamicMethodMatchers;
    }

    @Override
    @Nullable
    public Object proceed() throws Throwable {
        //    We start with an index of -1 and increment early.
        if (this.currentInterceptorIndex == this.interceptorsAndDynamicMethodMatchers.size() - 1) {
            //遞歸結束
            return invokeJoinpoint();
        }
        //獲取攔截器,並且當前的指針+1
        Object interceptorOrInterceptionAdvice = this.interceptorsAndDynamicMethodMatchers.get(++this.currentInterceptorIndex);
        if (interceptorOrInterceptionAdvice instanceof InterceptorAndDynamicMethodMatcher) {
            InterceptorAndDynamicMethodMatcher dm =
                (InterceptorAndDynamicMethodMatcher) interceptorOrInterceptionAdvice;
            if (dm.methodMatcher.matches(this.method, this.targetClass, this.arguments)) {
                return dm.interceptor.invoke(this);
            }
            else {
                //匹配失敗,跳過,遞歸下一個
                return proceed();
            }
        }
        else {
            //匹配攔截器,強轉為攔截器,然後執行invoke()方法,然後就會調用攔截器裡的成員變量的before(),afterReturning()等等,實現前置通知,後置通知,異常通知
            return ((MethodInterceptor) interceptorOrInterceptionAdvice).invoke(this);
        }
    }
}
這裡可能沒學過責任鏈模式的同學會看得有點暈,但是學過責任鏈模式應該很容易看懂,這其實跟SpringMVC的攔截器的邏輯實現幾乎一樣的。
觀察者模式
觀察者模式是一種對象行為型模式,當一個對象發生變化時,這個對象所依賴的對象也會做出反應。Spring 事件驅動模型就是觀察者模式很經典的一個應用。
事件角色
在Spring事件驅動模型中,首先有事件角色ApplicationEvent,這是一個抽象類,抽象類下有四個實現類代表四種事件。
- ContextStartedEvent:ApplicationContext啟動後觸發的事件。
- ContextStoppedEvent:ApplicationContext停止後觸發的事件。
- ContextRefreshedEvent:ApplicationContext初始化或刷新完成後觸發的事件。
- ContextClosedEvent:ApplicationContext關閉後觸發的事件。

事件發佈者
有了事件之後,需要有個發佈者發佈事件,發佈者對應的類是ApplicationEventPublisher。
@FunctionalInterface
public interface ApplicationEventPublisher {
    default void publishEvent(ApplicationEvent event) {
        publishEvent((Object) event);
    }

    void publishEvent(Object event);

}
@FunctionalInterface表示這是一個函數式接口,函數式接口只有一個抽象方法。ApplicationContext類又繼承了
ApplicationEventPublisher類,所以我們可以使用ApplicationContext發佈事件。
事件監聽者
發佈事件後需要有事件的監聽者,事件監聽者通過實現接口ApplicationListener來定義,這是一個函數式接口,並且帶有泛型,要求E參數是ApplicationEvent的子類。
@FunctionalInterface
public interface ApplicationListener<E extends ApplicationEvent> extends EventListener {

    void onApplicationEvent(E event);
}
下面我們演示一下怎麼使用,首先繼承抽象類ApplicationEvent定義一個事件角色PayApplicationEvent。
public class PayApplicationEvent extends ApplicationEvent {

    private String message;

    public PayApplicationEvent(Object source, String message) {
        super(source);
        this.message = message;
    }

    public String getMessage() {
        return message;
    }
}
接著定義一個PayApplicationEvent事件的監聽者PayListener。
@Component
public class PayListener implements ApplicationListener<PayApplicationEvent> {

    @Override
    public void onApplicationEvent(PayApplicationEvent event) {
        String message = event.getMessage();
        System.out.println("監聽到PayApplicationEvent事件,消息為:" + message);
    }
}
最後我們使用ApplicationContext發佈事件。
@SpringBootApplication
public class SpringmvcApplication {

    public static void main(String[] args) throws Exception {
        ApplicationContext applicationContext = SpringApplication.run(SpringmvcApplication.class, args);
        applicationContext.publishEvent(new PayApplicationEvent(applicationContext,"成功支付100元!"));
    }

}
啟動之後我們可以看到控制檯打印:
絮叨
實際上,Spring中使用到的設計模式在源碼中隨處可見,並不止我列舉的這些,所以Spring的源碼非常值得去閱讀和學習,受益良多。反過來看,如果不會設計模式,讀起源碼來也是非常費勁的,所以我建議還是先學會設計模式再去學習源碼。
希望大家看完之後,能對Spring有更深入的瞭解,那麼這篇文章就講到這裡了,感謝大家的閱讀。
覺得有用就點個贊吧,你的點贊是我創作的最大動力~
我是一個努力讓大家記住的程序員。我們下期再見!!!
能力有限,如果有什麼錯誤或者不當之處,請大家批評指正,一起學習交流!