Step By Step
一、設備端開發
1、pom.xml
    <dependencies>
        <dependency>
            <groupId>org.eclipse.paho</groupId>
            <artifactId>org.eclipse.paho.client.mqttv3</artifactId>
            <version>1.1.0</version>
        </dependency>
        <dependency>
            <groupId>com.google.guava</groupId>
            <artifactId>guava</artifactId>
            <version>23.0</version>
        </dependency>
        <dependency>
            <groupId>com.alibaba</groupId>
            <artifactId>fastjson</artifactId>
            <version>1.2.62</version>
        </dependency>

        <dependency>
            <groupId>com.aliyun.oss</groupId>
            <artifactId>aliyun-sdk-oss</artifactId>
            <version>3.8.0</version>
        </dependency>
    </dependencies>
2、Device Code Sample
import com.alibaba.taro.AliyunIoTSignUtil;
import com.aliyun.oss.OSS;
import com.aliyun.oss.OSSClientBuilder;
import com.aliyun.oss.model.CannedAccessControlList;
import com.aliyun.oss.model.ObjectMetadata;
import com.aliyun.oss.model.PutObjectRequest;
import com.google.common.util.concurrent.ThreadFactoryBuilder;
import org.eclipse.paho.client.mqttv3.*;
import org.eclipse.paho.client.mqttv3.persist.MemoryPersistence;

import java.io.File;
import java.util.HashMap;
import java.util.Map;
import java.util.concurrent.ScheduledExecutorService;
import java.util.concurrent.ScheduledThreadPoolExecutor;
import java.util.concurrent.TimeUnit;

public class FaceDemoUpload {

    public static String productKey = "a1o9N******";
    public static String deviceName = "d******";
    public static String deviceSecret = "7Ukl6Ka80nIEXhUwCmw7XrUC********";
    public static String regionId = "cn-shanghai";

    // 物模型-屬性上報topic
    private static String pubTopic = "/sys/" + productKey + "/" + deviceName + "/thing/event/property/post";
    // 自定義topic,在產品Topic列表位置定義
    private static String subTopic = "/sys/" + productKey + "/" + deviceName + "/thing/event/property/post_reply";

    private static MqttClient mqttClient;

    public static void main(String[] args) {

        initAliyunIoTClient();
        ScheduledExecutorService scheduledThreadPool = new ScheduledThreadPoolExecutor(1,
                new ThreadFactoryBuilder().setNameFormat("thread-runner-%d").build());

        scheduledThreadPool.scheduleAtFixedRate(() -> postDeviceProperties(), 10, 5, TimeUnit.SECONDS);

        try {
            mqttClient.subscribe(subTopic); // 訂閱Topic
        } catch (MqttException e) {
            System.out.println("error:" + e.getMessage());
            e.printStackTrace();
        }

        // 設置訂閱監聽
        mqttClient.setCallback(new MqttCallback() {
            @Override
            public void connectionLost(Throwable throwable) {
                System.out.println("connection Lost");

            }

            @Override
            public void messageArrived(String s, MqttMessage mqttMessage) throws Exception {
                System.out.println("Sub message");
                System.out.println("Topic : " + s);
                System.out.println(new String(mqttMessage.getPayload())); //打印輸出消息payLoad
            }

            @Override
            public void deliveryComplete(IMqttDeliveryToken iMqttDeliveryToken) {

            }
        });

    }

    /**
     * 初始化 Client 對象
     */
    private static void initAliyunIoTClient() {

        try {
            // 構造連接需要的參數
            String clientId = "java" + System.currentTimeMillis();
            Map<String, String> params = new HashMap<>(16);
            params.put("productKey", productKey);
            params.put("deviceName", deviceName);
            params.put("clientId", clientId);
            String timestamp = String.valueOf(System.currentTimeMillis());
            params.put("timestamp", timestamp);
            // cn-shanghai
            String targetServer = "tcp://" + productKey + ".iot-as-mqtt." + regionId + ".aliyuncs.com:1883";

            String mqttclientId = clientId + "|securemode=3,signmethod=hmacsha1,timestamp=" + timestamp + "|";
            String mqttUsername = deviceName + "&" + productKey;
            String mqttPassword = AliyunIoTSignUtil.sign(params, deviceSecret, "hmacsha1");

            connectMqtt(targetServer, mqttclientId, mqttUsername, mqttPassword);

        } catch (Exception e) {
            System.out.println("initAliyunIoTClient error " + e.getMessage());
        }
    }

    public static void connectMqtt(String url, String clientId, String mqttUsername, String mqttPassword) throws Exception {

        MemoryPersistence persistence = new MemoryPersistence();
        mqttClient = new MqttClient(url, clientId, persistence);
        MqttConnectOptions connOpts = new MqttConnectOptions();
        // MQTT 3.1.1
        connOpts.setMqttVersion(4);
        connOpts.setAutomaticReconnect(false);
        connOpts.setConnectionTimeout(10);
//        connOpts.setCleanSession(true);
        connOpts.setCleanSession(false);

        connOpts.setUserName(mqttUsername);
        connOpts.setPassword(mqttPassword.toCharArray());
        connOpts.setKeepAliveInterval(60);

        mqttClient.connect(connOpts);
    }

    /**
     * 彙報屬性
     */
    private static void postDeviceProperties() {

        try {
            //上報數據
            //高級版 物模型-屬性上報payload
            System.out.println("上報屬性值");

            //上傳本地圖片
            // Request body  C:\Users\Administrator\Desktop\timg.jpg
            String pic_path = "C:\\Users\\Administrator\\Desktop\\timg.jpg";//本地圖片的路徑

            String picURL = uploadPicToOss(pic_path);

            String payloadJson = "{\"params\":{\"textdata\":\"" + picURL + "\"}}";
            MqttMessage message = new MqttMessage(payloadJson.getBytes("utf-8"));
            message.setQos(1);
            mqttClient.publish(pubTopic, message);
        } catch (Exception e) {
            System.out.println(e.getMessage());
        }
    }


    public static String uploadPicToOss(String filePath) {
        // Endpoint以上海為例,其它Region請按實際情況填寫。
        String endpoint = "http://oss-cn-shanghai.aliyuncs.com";
        String bucketName = "taro******";  // bucket名稱
        String key = "pic/timg.jpg";   // 文件路徑及名稱
        // 阿里雲主賬號AccessKey擁有所有API的訪問權限,風險很高。強烈建議您創建並使用RAM賬號進行API訪問或日常運維,請登錄 https://ram.console.aliyun.com 創建RAM賬號。
        String accessKeyId = "LTAIOZZg********";
        String accessKeySecret = "v7CjUJCMk7j9aKduMA************";

        // 創建OSSClient實例。
        OSS ossClient = new OSSClientBuilder().build(endpoint, accessKeyId, accessKeySecret);

        // 創建PutObjectRequest對象。
        PutObjectRequest putObjectRequest = new PutObjectRequest(bucketName, key, new File(filePath));

        // 如果需要上傳時設置存儲類型與訪問權限,請參考以下示例代碼。
        ObjectMetadata metadata = new ObjectMetadata();

        // metadata.setHeader(OSSHeaders.OSS_STORAGE_CLASS, StorageClass.Standard.toString());
        metadata.setObjectAcl(CannedAccessControlList.PublicRead);
        putObjectRequest.setMetadata(metadata);

        // 上傳文件。
        ossClient.putObject(putObjectRequest);

        // 關閉OSSClient。
        ossClient.shutdown();

        return "https://" + bucketName + ".oss-cn-shanghai.aliyuncs.com/" + key; // 返回圖片在OSS中公網可以直接訪問的URL
    }
}參考鏈接:基於開源JAVA MQTT Client連接阿里雲IoT
二、服務開發模塊搭建
1、設備觸發
2、Node.js 腳本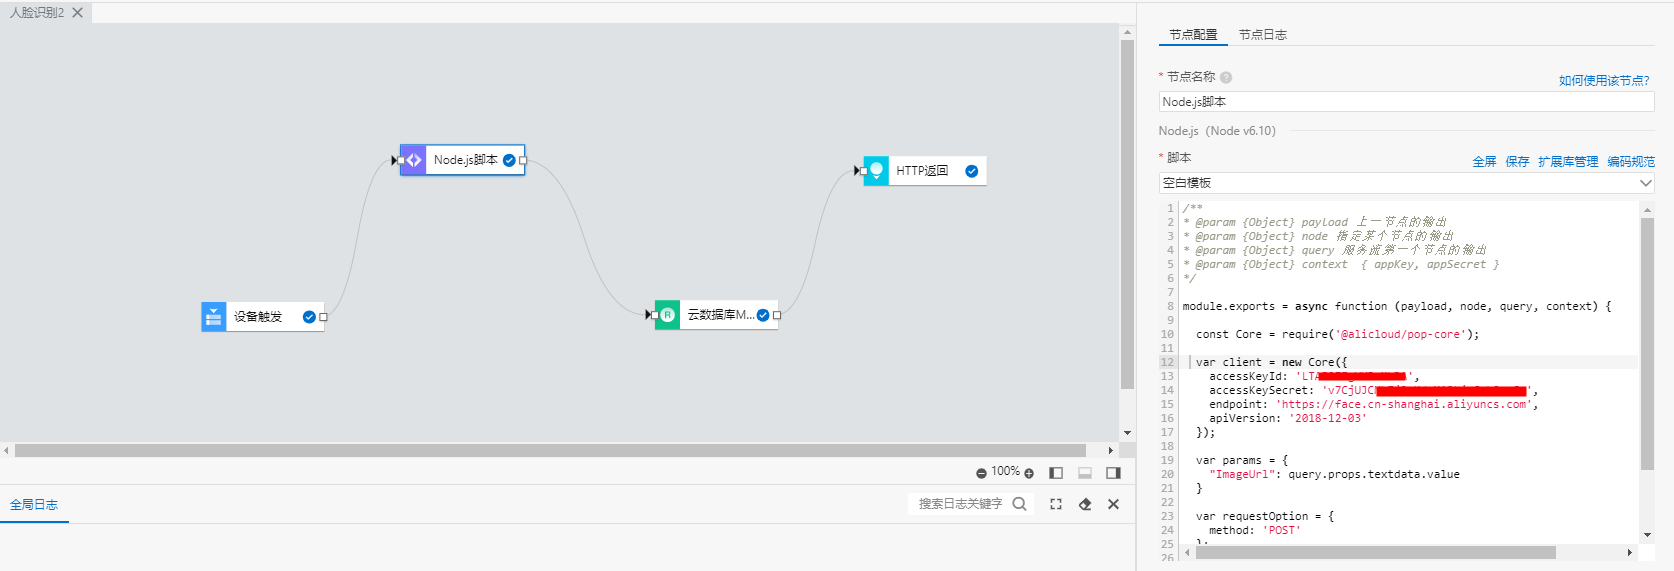
/**
* @param {Object} payload 上一節點的輸出
* @param {Object} node 指定某個節點的輸出
* @param {Object} query 服務流第一個節點的輸出
* @param {Object} context  { appKey, appSecret }
*/

module.exports = async function (payload, node, query, context) {

  const Core = require('@alicloud/pop-core');

  var client = new Core({
    accessKeyId: 'LTAIOZZg********',
    accessKeySecret: 'v7CjUJCMk7j9aKduMA************',
    endpoint: 'https://face.cn-shanghai.aliyuncs.com',
    apiVersion: '2018-12-03'
  });

  var params = {
    "ImageUrl": query.props.textdata.value
  }

  var requestOption = {
    method: 'POST'
  };

    var result = await client.request('GetFaceAttribute', params, requestOption);
    return result;
}三、雲數據庫MySQL
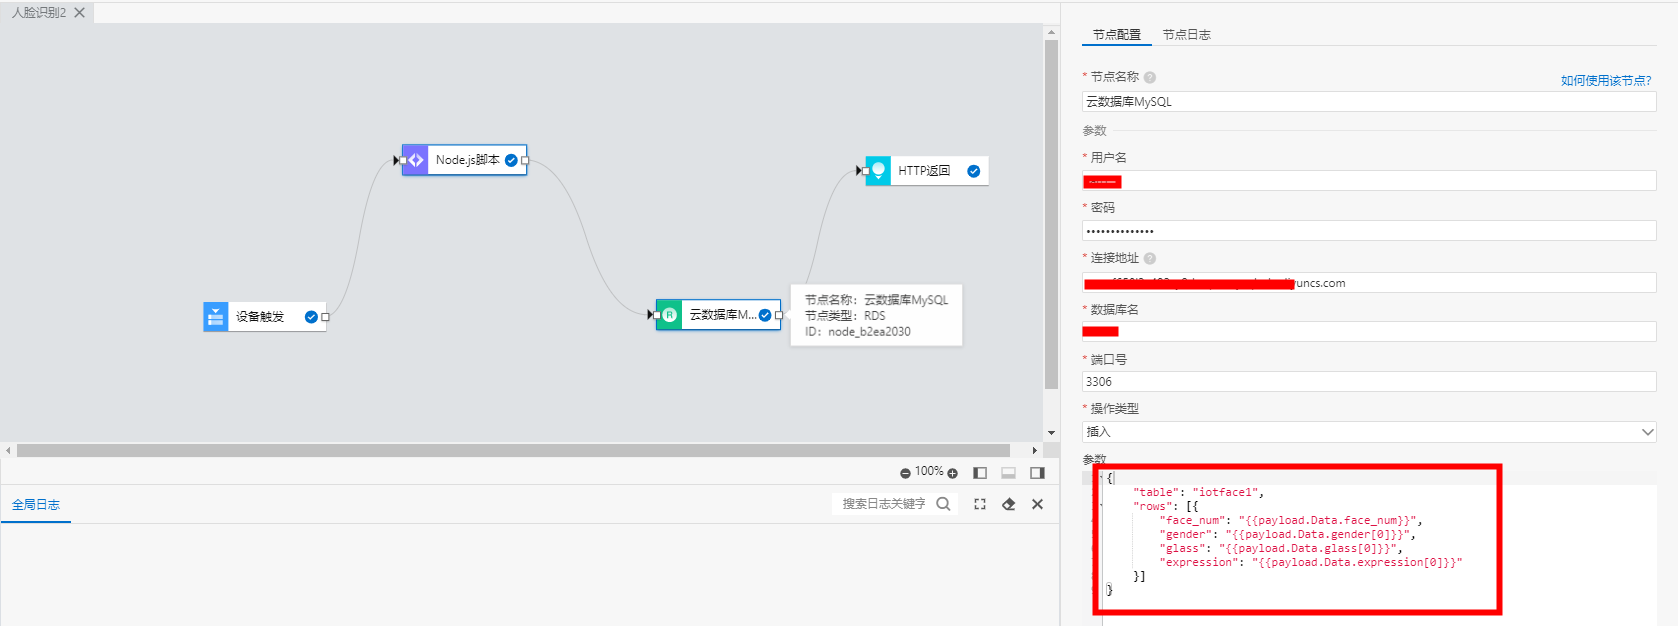
數據庫建表語句:
/*------- CREATE SQL---------*/
CREATE TABLE `iotface1` (
  `face_num` INT DEFAULT NULL,
  `gender` INT DEFAULT NULL,
  `glass` INT DEFAULT NULL,
  `expression` INT DEFAULT NULL
) ENGINE=InnoDB DEFAULT CHARSET=utf8部署運行
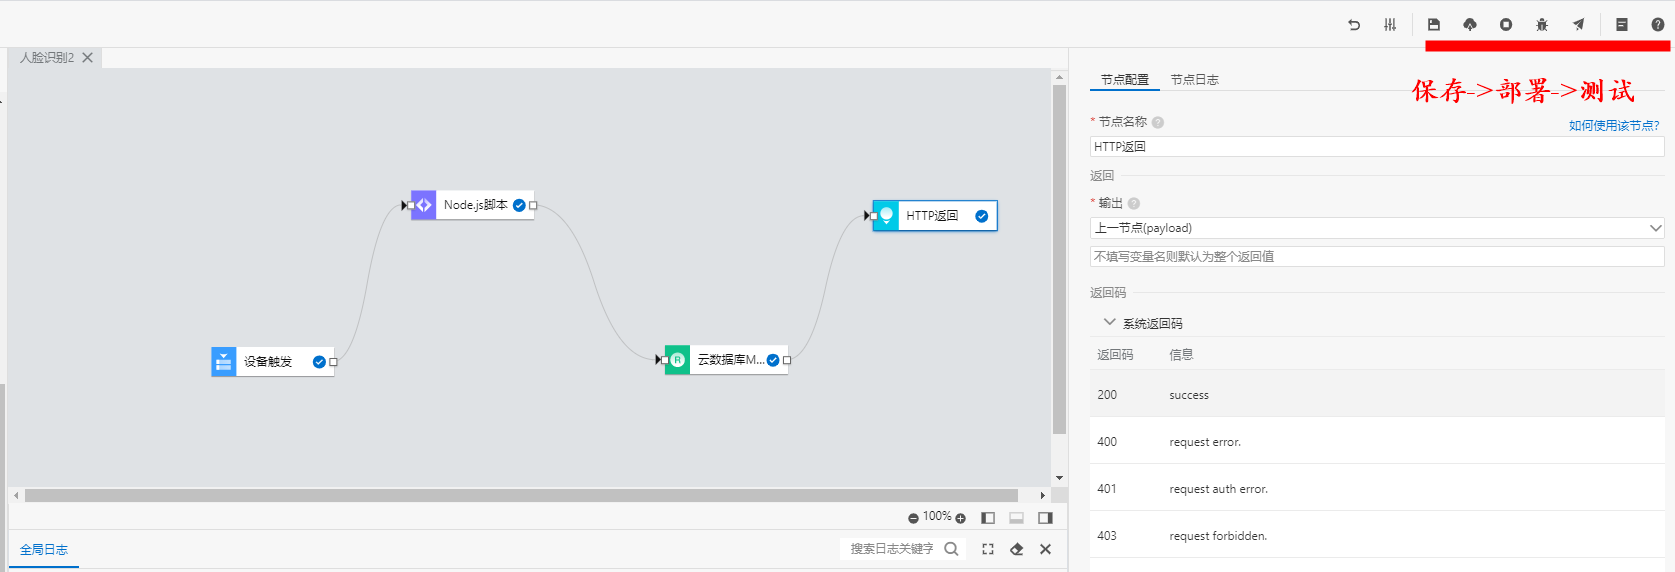
四、運行測試
1、設備端日誌
2、節點日誌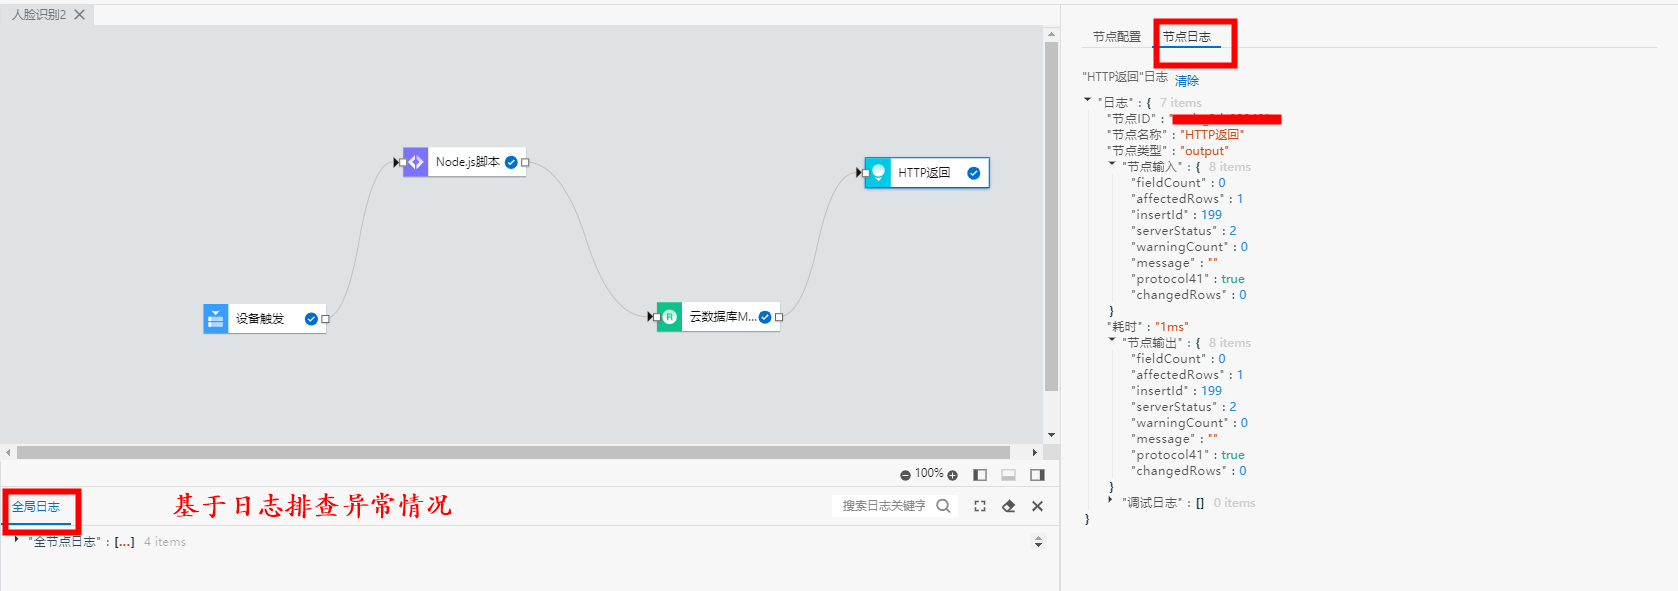
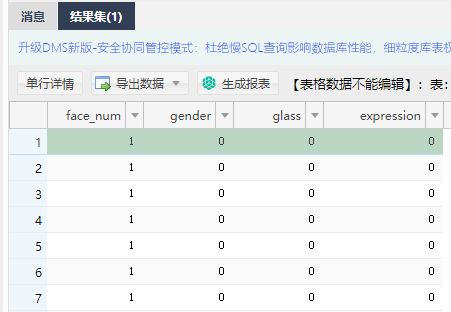
3、數據庫輸入插入查詢