前言
為什麼需要Binpack功能?
Kubernetes默認開啟的資源調度策略是LeastRequestedPriority,消耗的資源最少的節點得分最高,優先被調度。這樣的資源選擇情況有可能導致較多的資源碎片,如下圖所示,兩個節點各剩餘1GPU的資源,導致申請2GPU的作業無法調度,導致整體資源使用率下降。
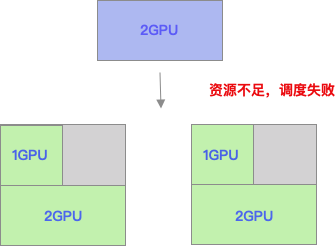
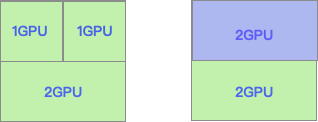
如果使用的資源調度策略是Binpack,優先將節點填滿之後,再調度下一個節點,則上圖所出現的資源碎片問得到解決,申請2GPU的作業被正常調度到節點上,提升了集群的資源使用率。
實現方案
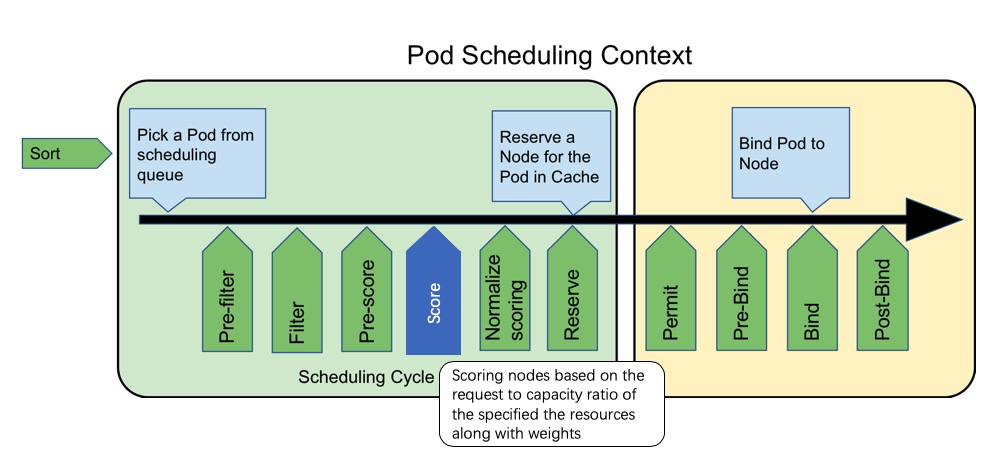
Binpack實現已經抽象成Scheduler Framework的Score插件,用於優選階段節點打分。具體的實現可以分為兩個部分,構建打分函數和打分.
構建打分函數
構建打分函數的過程比較容易理解,就是用戶可以自己定義不同的利用率所對應的分值大小,以便影響調度的決策過程。
1.如果用戶設定的對應方式如下所示,即如果資源利用率為0的時候,得分為0分,當資源利用率為100時,得分為10分,所以得到的資源利用率越高,得分越高,則這個行為是Binpack的資源選擇方式。

2.用戶也可以設置成利用率為0時,得分為10分,利用率為100時,得分為0分。這樣意味著資源利用率越低,則得分越高,這種行為是spread的資源選擇方式。

3.用戶除了2個點之外也可以新增更多的點,對應關係可以不是線性的關係,例如可以標識資源利用率為50時,得分為8,則會將打分分割為兩個區間: 0-50和50-100。

打分
用戶可以自己定義在Binpack計算中所要參考的資源以及權重值,例如可以只是設定GPU和CPU的值和權重。
resourcetoweightmap:
  "cpu": 1
  "nvidia.com/gpu": 1
然後在打分過程總,會通過計算(pod.Request + node.Allocated)/node.Total的結果得到對應資源的利用率,並且將利用率帶入上文中所述的打分函數中,得到相應的分數。最後將所有的資源根據weight值,加權得到最終的分數。
Score = line(resource1_utilization) * weight1 + line(resource2_utilization) * weight2 ....) / (weight1 + weight2 ....)Binpack使用
前提條件
- 目前需要使用CPU和內存的Binpack時,需要支持Kubernetes 1.14及以上版本
- 需要支持GPU等擴展資源的Binpack時,需要支持Kubernetes 1.16及以上版本
配置方法
- 修改 /etc/kubernetes/manifests/kube-scheduler.yaml, 在Kube-scheduler的啟動命令中增加--policy-config-file=/etc/kubernetes/scheduler-policy.json, 並且配置相應的volumes和volumeMounts支持目錄掛載,配置的參考示例:
apiVersion: v1
kind: Pod
metadata:
  creationTimestamp: null
  labels:
    component: kube-scheduler
    tier: control-plane
  name: kube-scheduler
  namespace: kube-system
spec:
  containers:
  - command:
    - kube-scheduler
    - --bind-address=127.0.0.1
    - --kubeconfig=/etc/kubernetes/scheduler.conf
    - --leader-elect=true
    - -v=3
    - --policy-config-file=/etc/kubernetes/scheduler-policy.json
    image: registry-vpc.cn-beijing.aliyuncs.com/acs/kube-scheduler:v1.14.8-aliyun.1
    imagePullPolicy: IfNotPresent
    livenessProbe:
      failureThreshold: 8
      httpGet:
        host: 127.0.0.1
        path: /healthz
        port: 10251
        scheme: HTTP
      initialDelaySeconds: 15
      timeoutSeconds: 15
    name: kube-scheduler
    resources:
      requests:
        cpu: 100m
    volumeMounts:
    - mountPath: /etc/kubernetes/scheduler.conf
      name: kubeconfig
      readOnly: true
    - mountPath: /etc/localtime
      name: localtime
    - mountPath: /etc/kubernetes/scheduler-policy.json
      name: policy
  hostNetwork: true
  priorityClassName: system-cluster-critical
  volumes:
  - hostPath:
      path: /etc/kubernetes/scheduler.conf
      type: FileOrCreate
    name: kubeconfig
  - hostPath:
      path: /etc/localtime
      type: ""
    name: localtime
  - hostPath:
      path: /etc/kubernetes/scheduler-policy.json
      type: FileOrCreate
    name: policy
status: {}- 新建/etc/kubernetes/scheduler-policy.json, 用戶可以自行配置其他的priorities策略。
{
  "kind" : "Policy",
  "apiVersion" : "v1",
  "priorities" : [
      {
          "name":"RequestedToCapacityRatioPriority",
          "weight":5,
          "argument":{
             "requestedToCapacityRatioArguments":{
                "shape":[
                   {
                      "utilization":0,
                      "score":0
                   },
                   {
                      "utilization":100,
                      "score":10
                   }
                ],
                "resources":[
                   {
                      "name":  "cpu",
                      "weight":  1
                   },
                   {
                      "name":  "nvidia.com/gpu",
                      "weight":  1
                   }
                ]
             }
          }
      }
      ]
}
Demo演示
當前集群有3個節點, 每個節點的CPU剩餘資源為3.6個cpu
1.如果當前集群沒有開啟Binpack的功能是,我們創建nginx容器
apiVersion: apps/v1
kind: ReplicaSet
metadata:
  name: nginx
  labels:
    app: nginx
spec:
  replicas: 6
  selector:
    matchLabels:
      app: nginx
  template:
    metadata:
      name: nginx
      labels:
        app: nginx
    spec:
      containers:
      - name: nginx
        image: nginx
        resources:
          limits:
            cpu: 500m
            memory: 500Mi
          requests:
            cpu: 500m
            memory: 500Mi
結果是所有的pod被均勻的分佈到3個節點上。
# kubectl get pods -o wide
NAME          READY   STATUS    RESTARTS   AGE   IP             NODE                       NOMINATED NODE   READINESS GATES
nginx-5rh66   1/1     Running   0          34s   172.20.0.211   cn-beijing.192.168.5.232   <none>           <none>
nginx-859lz   1/1     Running   0          34s   172.20.0.210   cn-beijing.192.168.5.232   <none>           <none>
nginx-bjsfq   1/1     Running   0          34s   172.20.1.8     cn-beijing.192.168.5.231   <none>           <none>
nginx-hnpfg   1/1     Running   0          34s   172.20.1.75    cn-beijing.192.168.5.233   <none>           <none>
nginx-kgc58   1/1     Running   0          34s   172.20.1.9     cn-beijing.192.168.5.231   <none>           <none>
nginx-sbhxl   1/1     Running   0          34s   172.20.1.74    cn-beijing.192.168.5.233   <none>           <none>
2.如果開啟了Binpack的功能時,如下面結果所示, 所有的Nginx pod被分配到同一個節點cn-beijing.192.168.5.232上,優先打滿一個節點
# kubectl get pods -o wide
NAME          READY   STATUS    RESTARTS   AGE   IP             NODE                       NOMINATED NODE   READINESS GATES
nginx-62ltj   1/1     Running   0          68s   172.20.0.204   cn-beijing.192.168.5.232   <none>           <none>
nginx-75fzz   1/1     Running   0          68s   172.20.0.206   cn-beijing.192.168.5.232   <none>           <none>
nginx-8mxl8   1/1     Running   0          68s   172.20.0.209   cn-beijing.192.168.5.232   <none>           <none>
nginx-pbv9s   1/1     Running   0          68s   172.20.0.208   cn-beijing.192.168.5.232   <none>           <none>
nginx-qrkqh   1/1     Running   0          68s   172.20.0.207   cn-beijing.192.168.5.232   <none>           <none>
nginx-xgfgq   1/1     Running   0          68s   172.20.0.205   cn-beijing.192.168.5.232   <none>           <none>