本文來自於千鋒教育在阿里雲開發者社區學習中心上線課程《SpringBoot實戰教程》,主講人楊紅豔,點擊查看視頻內容。
SpringBoot整合Mybatis(xml方式)
首先需要添加mybatis、MySQL、druid數據庫連接池、分頁、依賴:
<!-- springboot整合mybatis -->
        <dependency>
            <groupId>org.mybatis.spring.boot</groupId>
            <artifactId>mybatis-spring-boot-starter</artifactId>
            <version>1.3.1</version>
        </dependency>
<!-- MySQL -->
        <dependency>
            <groupId>mysql</groupId>
            <artifactId>mysql-connector-java</artifactId>
        </dependency>
<!-- alibaba的druid數據庫連接池 -->
         <dependency>
            <groupId>com.alibaba</groupId>
            <artifactId>druid-spring-boot-starter</artifactId>
            <version>1.1.0</version>
        </dependency>
        <dependency>
            <groupId>com.alibaba</groupId>
            <artifactId>druid</artifactId>
            <version>1.0.11</version>
        </dependency>
<!-- 分頁插件 -->
        <dependency>
            <groupId>com.github.pagehelper</groupId>
            <artifactId>pagehelper-spring-boot-starter</artifactId>
            <version>1.1.2</version>
        </dependency>
<!-- @Param註解在該包中 -->
        <dependency>
            <groupId>org.apache.ibatis</groupId>
            <artifactId>ibatis-core</artifactId>
            <version>3.0</version>
        </dependency>
仍然使用db1的users表。
創建Mybatis的配置文件mybatis-config.xml:
<?xml version="1.0" encoding="UTF-8" ?>
<!DOCTYPE configuration
        PUBLIC "-//mybatis.org//DTD Config 3.0//EN"
        "http://mybatis.org/dtd/mybatis-3-config.dtd">
<configuration>

</configuration>
創建全局配置文件:application.yml
數據源配置、Mybatis配置、PageHelper分頁插件的屬性配置:
spring:
    datasource:
        name: test
        url: jdbc:mysql://127.0.0.1:3306/db1
        username: root
        password: root
        type: com.alibaba.druid.pool.DruidDataSource
        driver-class-name: com.mysql.jdbc.Driver
        filters: stat
        maxActive: 20
        initialSize: 1
        maxWait: 60000
        minIdle: 1
        timeBetweenEvictionRunsMillis: 60000
        minEvictableIdleTimeMillis: 300000
        validationQuery: select 'x'
        testWhileIdle: true
        testOnBorrow: false
        testOnReturn: false
        poolPreparedStatements: true
        maxOpenPreparedStatements: 20

mybatis:
  mapper-locations:
  classpath:mapping/UsersMapper.xml
  #type-aliases-package: com.db1.pojo
  config-location: classpath:mybatis/mybatis-config.xml

pagehelper:
   helperDialect: mysql
   reasonable: true
   supportMethodsArguments: true
   params: count=countSql
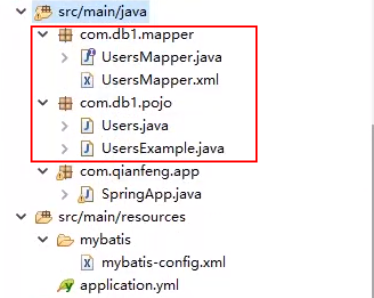
逆向生成com.db1.pojo以及com.db1.mapper。相當於Dao層。

UsersService:
public interface UsersService {

     //添加用戶
    void addUser(Users user);

    //分頁查找用戶
    List<Users>findUsers(int page, int rows);
}
UsersServiceImpl:
@Service
public class UsersServiceImpl implements UsersService {

    @Autowired
    private UsersMapper userMapper;

    @Override
    public void addUser(Users user) {

        usersMapper.insert(user);
    }

    @Override
    public List<Users>findUsers(int page, int rows) {
        UsersExample example = new UsersExample();
        PageHelper.startPage(page, rows);
        List<Users> users = usersMapper.selectByExample(example);
        return users;
    }
}
UserController:
@Controller
public class UserController {

    @Autowired
    private UsersService usersService;

    @RequestMapping("/savaUser")
    @ResponseBody
    public String saveUsers() {
        Users user = new Users();
        user.setName("小紅");
        user.setPassword("7777");
        user.setEmail("[email protected]");
        user.setBirthday(new Date());

        usersService.addUser(user);
        return "success";
    }


    @RequestMapping("/findUsers/{page}/{rows}")
    @ResponseBody
    public List<Users> findUsers(@PathVariable int page, @PathVariable int rows) {
        return usersService.findUsers(page, rows);
    }
}
在啟動類中添加所有需要掃描的包,mapper需要單獨掃描
@SpringBootApplication(scanBasePackages="com.qianfeng")
@MapperScan("com.db1.mapper")
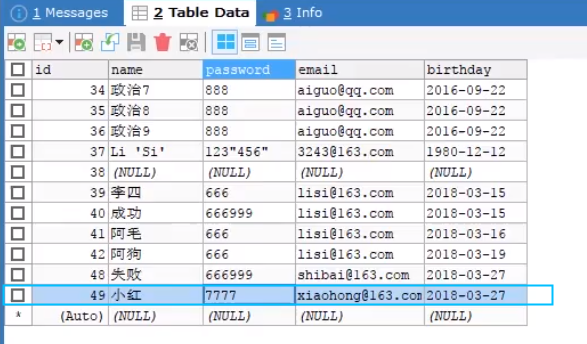
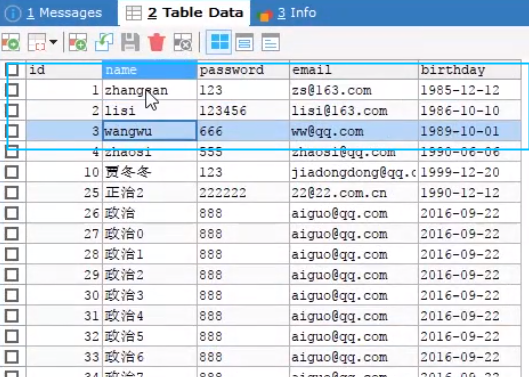
執行結果:


