單控制平面拓撲下,多個 Kubernetes 集群共同使用在其中一個集群上運行的單個 Istio 控制平面。控制平面的 Pilot 管理本地和遠程集群上的服務,併為所有集群配置 Envoy Sidecar 代理。
集群感知的服務路由
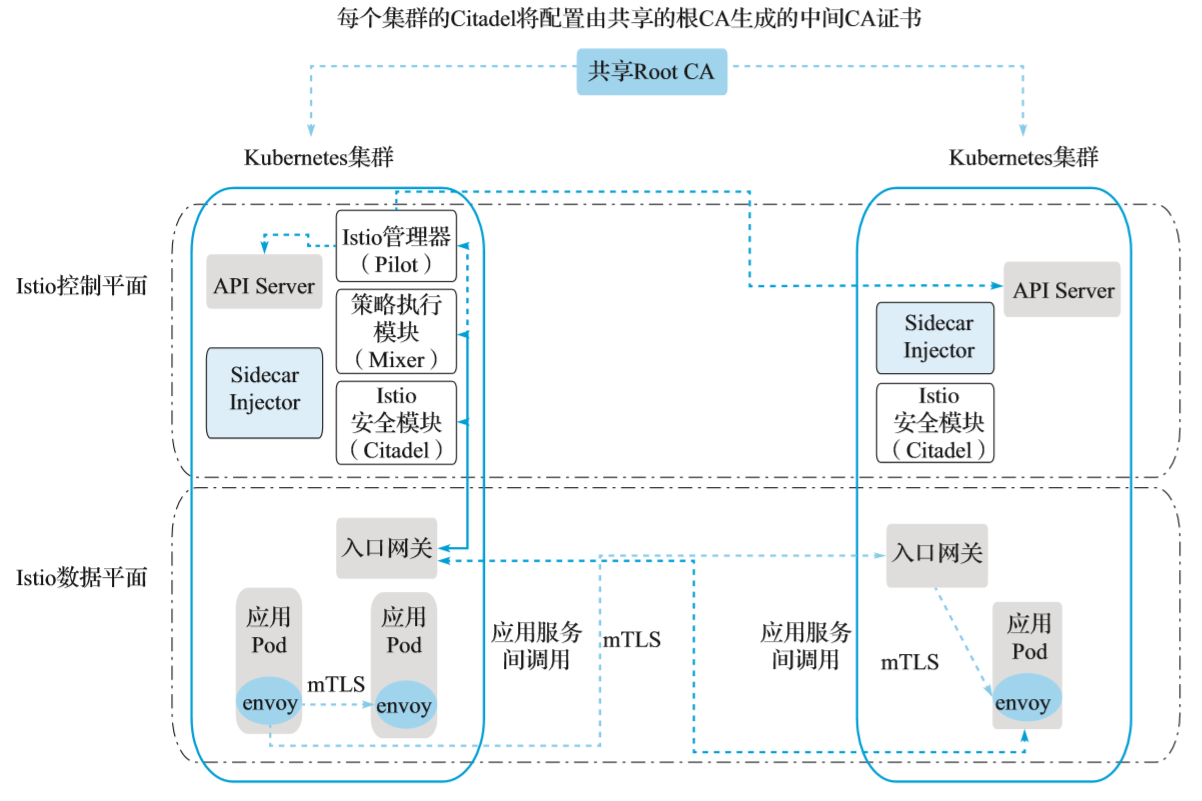
Istio 1.1 中引入了集群感知的服務路由能力,在單一控制平面拓撲配置下,使用 Istio 的 Split-horizon EDS(水平分割端點發現服務)功能可以通過其入口網關將服務請求路由到其他集群。基於請求源的位置,Istio 能夠將請求路由到不同的端點。
在該配置中,從一個集群中的 Sidecar 代理到同一集群中的服務的請求仍然被轉發到本地服務 IP。如果目標工作負載在其他集群中運行,則使用遠程集群的網關 IP 來連接到該服務。

(集群感知的服務路由)
如圖所示,主集群 cluster1 運行全套的 Istio 控制平面組件,同時集群 cluster2 僅運行 Istio Citadel、Sidecar Injector 和 Ingress 網關。不需要 VPN 連接,不同集群中的工作負載之間也不需要直接網絡訪問。
從共享的根 CA 為每個集群的 Citadel 生成中間 CA 證書,共享的根 CA 啟用跨不同集群的雙向 TLS 通信。為了便於說明,我們將 samples/certs 目錄下 Istio 安裝中提供的示例根 CA 證書用於兩個集群。在實際部署中,你可能會為每個集群使用不同的 CA 證書,所有 CA 證書都由公共根 CA 簽名。
在每個 Kubernetes 集群中(包括示例中的集群 cluster1 與 cluster2)使用以下命令為生成的 CA 證書創建 Kubernetes 密鑰:
kubectl
create namespace istio-system
kubectl
create secret generic cacerts -n istio-system \
--from-file=samples/certs/ca-cert.pem \
--from-file=samples/certs/ca-key.pem \
--from-file=samples/certs/root-cert.pem \
--from-file=samples/certs/cert-chain.pem
Istio 控制平面組件
在部署全套 Istio 控制平面組件的集群 cluster1 中,按照以下步驟執行:
1.安裝 Istio 的 CRD 並等待幾秒鐘,以便將它們提交給 Kubernetes API 服務器,如下所示:
for
i in install/kubernetes/helm/istio-init/files/crd*yaml; do kubectl apply -f $i;
done
2.然後開始在集群 cluster1 中部署 Istio 控制平面。
如果 helm 依賴項缺失或者不是最新的,可以通過 helm dep update 來更新這些依賴項。需要注意的是,因為沒有使用 istio-cni,可以暫時將其從依賴項 requirements.yaml 中去掉再執行更新操作。具體命令如下所示:
helm
template --name=istio --namespace=istio-system \
--set
global.mtls.enabled=true \
--set
security.selfSigned=false \
--set
global.controlPlaneSecurityEnabled=true \
--set
global.meshExpansion.enabled=true \
--set
global.meshNetworks.network2.endpoints[0].fromRegistry=n2-k8s-config \
--set
global.meshNetworks.network2.gateways[0].address=0.0.0.0 \
--set
global.meshNetworks.network2.gateways[0].port=15443 \
install/kubernetes/helm/istio
./istio-auth.yaml
請注意,網關地址設置為 0.0.0.0。這是一個臨時佔位符值,在集群 cluster2 部署之後將更新為其網關的公共 IP 值。
將 Istio 部署到 cluster1,如下所示:
kubectl
apply -f ./istio-auth.yaml
確保上述步驟在 Kubernetes 集群中執行成功。
3.創建網關以訪問遠程服務,如下所示:
kubectl
create -f - <apiVersion:
networking.istio.io/v1alpha3
kind:
Gateway
metadata:
name: cluster-aware-gateway
namespace: istio-system
spec:
selector:
istio: ingressgatewayservers:
-
port:
number: 15443
name: tls
protocol: TLS
tls:
mode: AUTO_PASSTHROUGH
hosts:- "*"
EOF
- "*"
上述網關配置了一個專用端口 15443 用來將傳入流量傳遞到請求的 SNI 標頭中指定的目標服務,從源服務到目標服務一直使用雙向 TLS 連接。
請注意雖然該網關定義應用於集群 cluster1,但因為兩個集群都與同一個 Pilot 進行通信,此網關實例同樣也適用於集群 cluster2。
istio-remote 組件
在另一集群 cluster2 中部署 istio-remote 組件,按照以下步驟執行:
1.首先獲取集群 cluster1 的入口網關地址,如下所示:
export
LOCAL_GW_ADDR=$(kubectl get svc --selector=app=istio-ingressgateway \
-n istio-system -o
jsonpath="{.items[0].status.loadBalancer.ingress[0].ip}")
通過執行以下命令,使用 Helm 創建 Istio remote 部署 YAML 文件:
helm
template --name istio-remote --namespace=istio-system \
--values
install/kubernetes/helm/istio/values-istio-remote.yaml \
--set
global.mtls.enabled=true \
--set
gateways.enabled=true \
--set
security.selfSigned=false \
--set
global.controlPlaneSecurityEnabled=true \
--set
global.createRemoteSvcEndpoints=true \
--set
global.remotePilotCreateSvcEndpoint=true \
--set
global.remotePilotAddress=${LOCAL_GW_ADDR} \
--set
global.remotePolicyAddress=${LOCAL_GW_ADDR} \
--set
global.remoteTelemetryAddress=${LOCAL_GW_ADDR} \
--set
gateways.istio-ingressgateway.env.ISTIO_META_NETWORK="network2" \
--set
global.network="network2" \
install/kubernetes/helm/istio
2.將 Istio remote 組件部署到 cluster2,如下所示:
kubectl
apply -f ./istio-remote-auth.yaml
確保上述步驟在 Kubernetes 集群中執行成功。
3.更新集群 cluster1 的配置項 istio,獲取集群 cluster2 的入口網關地址,如下所示:
export
REMOTE_GW_ADDR=$(kubectl get --context=$CTX_REMOTE svc --selector=app=
istio-ingressgateway
-n istio-system -o jsonpath="{.items[0].status.loadBalancer.ingress
[0].ip}")
在集群 cluster1 中編輯命名空間 istio-system 下的配置項 istio,替換 network2 的網關地址,從 0.0.0.0 變成集群 cluster2 的入口網關地址 ${REMOTE_GW_ADDR}。保存後,Pilot 將自動讀取更新的網絡配置。
4.創建集群 cluster2 的 Kubeconfig。通過以下命令,在集群 cluster2 上創建服務賬號 istio-multi 的 Kubeconfig,並保存為文件 n2-k8s-config:
CLUSTER_NAME="cluster2"
SERVER=$(kubectl
config view --minify=true -o "jsonpath={.clusters[].cluster.server}")
SECRET_NAME=$(kubectl
get sa istio-multi -n istio-system -o jsonpath='{.secrets[].name}')
CA_DATA=$(kubectl
get secret ${SECRET_NAME} -n istio-system -o
"jsonpath={.data['ca.crt']}")
TOKEN=$(kubectl
get secret ${SECRET_NAME} -n istio-system -o
"jsonpath={.data['token']}" | base64 --decode)
cat
< n2-k8s-config
apiVersion:
v1
kind:
Config
clusters:
-
cluster:
certificate-authority-data: ${CA_DATA}
server: ${SERVER}
name: ${CLUSTER_NAME}
contexts: -
context:
cluster: ${CLUSTER_NAME}
user: ${CLUSTER_NAME}
name: ${CLUSTER_NAME}
current-context:
${CLUSTER_NAME}
users:
-
name: ${CLUSTER_NAME}
user:token: ${TOKEN}EOF
5.將集群 cluster2 加入到 Istio 控制平面。
在集群 clusterl 執行以下命令,將上述生成的集群 cluster2 的 kubeconfig 添加到集群 cluster1 的 secret 中,執行這些命令後,集群 cluster1 中的 Istio Pilot 將開始監聽集群 cluster2 的服務和實例,就像監聽集群 cluster1 中的服務與實例一樣:
kubectl
create secret generic n2-k8s-secret --from-file n2-k8s-config -n istio-system
kubectl
label secret n2-k8s-secret istio/multiCluster=true -n istio-system
部署示例應用
為了演示跨集群訪問,在第一個 Kubernetes 集群 cluster1 中部署 sleep 應用服務和版本 v1 的 helloworld 服務,在第二個集群 cluster2 中部署版本 v2 的 helloworld 服務,然後驗證 sleep 應用是否可以調用本地或者遠程集群的 helloworld 服務。
1.部署 sleep 和版本 v1 的 helloworld 服務到第一個集群 cluster1 中,執行如下命令:
kubectl
create namespace app1
kubectl
label namespace app1 istio-injection=enabled
kubectl
apply -n app1 -f samples/sleep/sleep.yaml
kubectl
apply -n app1 -f samples/helloworld/service.yaml
kubectl
apply -n app1 -f samples/helloworld/helloworld.yaml -l version=v1
export
SLEEP_POD=$(kubectl get -n app1 pod -l app=sleep -o
jsonpath={.items..metadata.name})
2.部署版本 v2 的 helloworld 服務到第二個集群 cluster2 中,執行如下命令:
kubectl
create namespace app1
kubectl
label namespace app1 istio-injection=enabled
kubectl
apply -n app1 -f samples/helloworld/service.yaml
kubectl
apply -n app1 -f samples/helloworld/helloworld.yaml -l version=v2
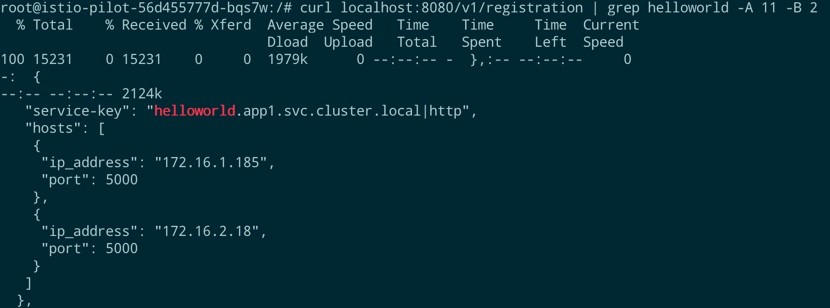
3.登錄到命名空間 istio-system 下的 istio-pilot 容器中,運行 curl localhost:8080/v1/registration | grep helloworld -A 11 -B 2 命令,如果得到如下類似的結果就說明版本 v1 與 v2 的 helloworld 服務都已經註冊到 Istio 控制平面中了:

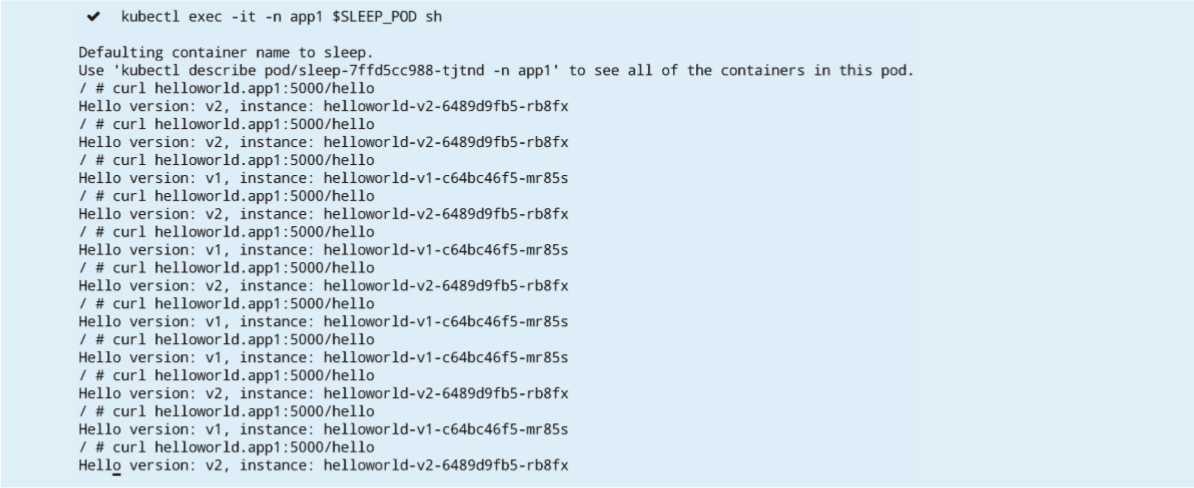
4.驗證在集群 cluster1 中的 sleep 服務是否可以正常調用本地或者遠程集群的 helloworld 服務,在集群 cluster1 下執行如下命令:
kubectl
exec -it -n app1 $SLEEP_POD sh

登錄到容器中,運行 curl helloworld.app1:5000/hello。
如果設置正確,則在返回的調用結果中可以看到兩個版本的 helloworld 服務,同時可以通過查看 sleep 容器組中的 istio-proxy 容器日誌來驗證訪問的端點 IP 地址,返回結果如下所示:

本文轉自<阿里巴巴雲原生技術圈>——阿里巴巴雲原生小助手