**一、nexus官網下載安裝包
**
https://www.sonatype.com/download-oss-sonatype
二、下載好的tar包上傳至服務器
- 解壓tar包命令
tar -zxvf ***.tar.gz- 解壓後能看到兩個文件夾
nexus-3.20.1-01:
bin下面有一個啟動文件nexus,啟動命令:
etc下的nexus-default.properties文件可修改端口號
sonatype-work:有一個臨時密碼文件存放在這,當修改密碼後臨時密碼文件會消失
三、登錄頁面
http:ip:端口號
- 第一次登錄使用臨時密碼登錄後修改密碼
- 倉庫介紹

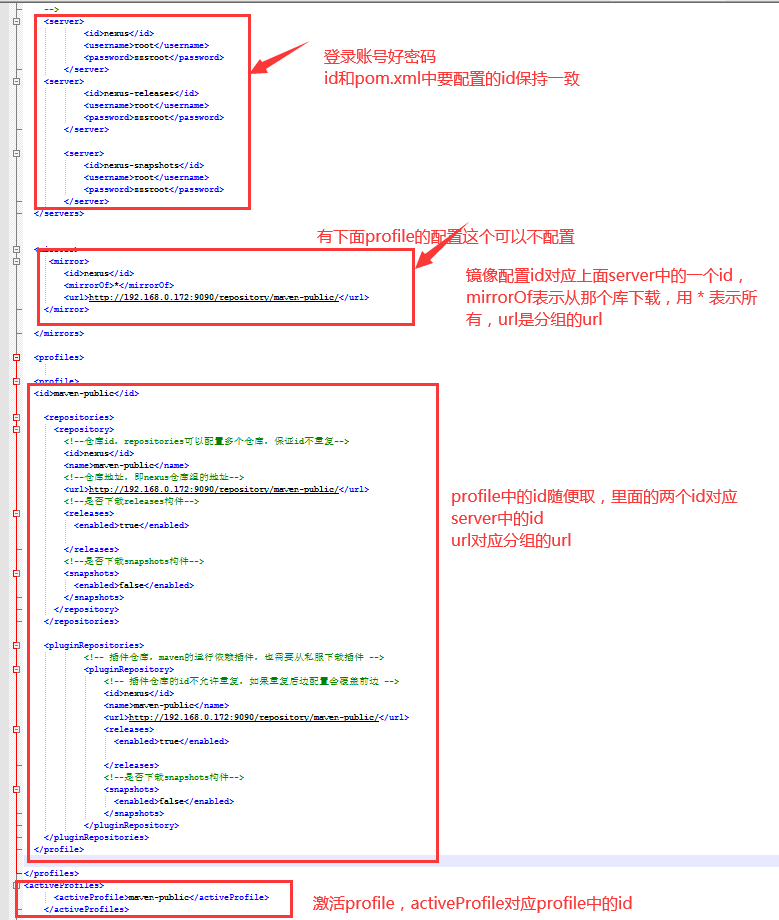
四、settings.xml配置及介紹

<server>
            <id>nexus</id>
            <username>root</username>
            <password>zzsroot</password>
        </server>
    <server>
            <id>nexus-releases</id>
            <username>root</username>
            <password>zzsroot</password>
        </server>

        <server>
            <id>nexus-snapshots</id>
            <username>root</username>
            <password>zzsroot</password>
        </server>
 <mirror>
        <id>nexus</id>
        <mirrorOf>*</mirrorOf>
        <url>http://192.168.0.172:9090/repository/maven-public/</url>
    </mirror>
 <profile>
  <id>maven-public</id>

    <repositories>
      <repository>
        <!--倉庫id,repositories可以配置多個倉庫,保證id不重複-->
        <id>nexus</id>
        <name>maven-public</name>
        <!--倉庫地址,即nexus倉庫組的地址-->
        <url>http://192.168.0.172:9090/repository/maven-public/</url>
        <!--是否下載releases構件-->
        <releases>
          <enabled>true</enabled>

        </releases>
        <!--是否下載snapshots構件-->
        <snapshots>
          <enabled>false</enabled>
        </snapshots>
      </repository>
    </repositories>

    <pluginRepositories>
            <!-- 插件倉庫,maven的運行依賴插件,也需要從私服下載插件 -->
            <pluginRepository>
                <!-- 插件倉庫的id不允許重複,如果重複後邊配置會覆蓋前邊 -->
                <id>nexus</id>
                <name>maven-public</name>
                <url>http://192.168.0.172:9090/repository/maven-public/</url>
                <releases>
                  <enabled>true</enabled>

                </releases>
                <!--是否下載snapshots構件-->
                <snapshots>
                  <enabled>false</enabled>
                </snapshots>
            </pluginRepository>
    </pluginRepositories>
  </profile>
<activeProfiles>
  <activeProfile>maven-public</activeProfile>
</activeProfiles>
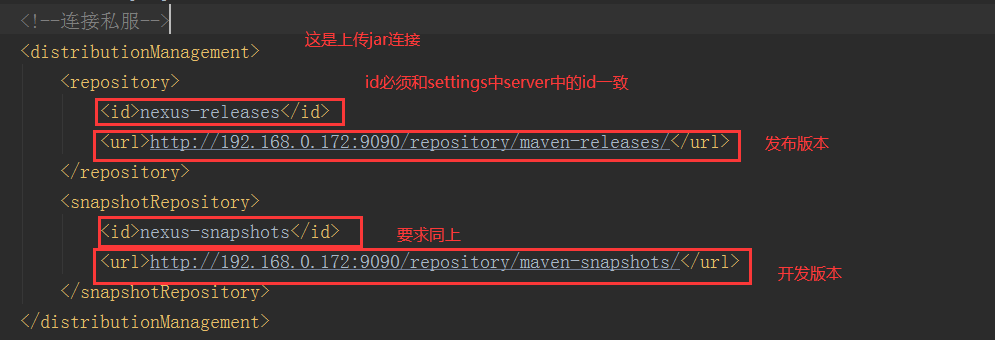
五、pom.xml配置及介紹

<distributionManagement>
        <repository>
            <id>nexus-releases</id>
            <url>http://192.168.0.172:9090/repository/maven-releases/</url>
        </repository>
        <snapshotRepository>
            <id>nexus-snapshots</id>
            <url>http://192.168.0.172:9090/repository/maven-snapshots/</url>
        </snapshotRepository>
    </distributionManagement>
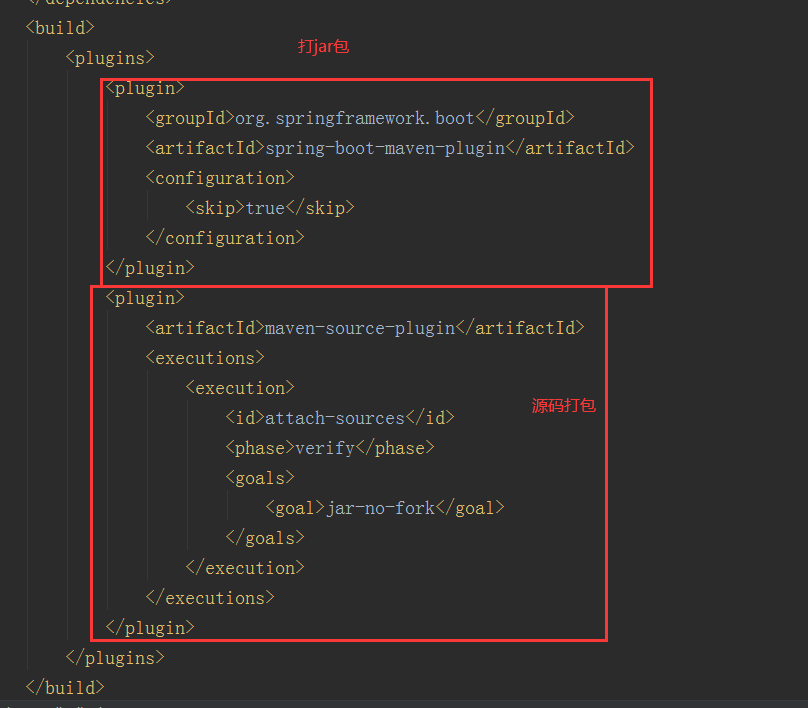
<build>
        <plugins>
            <plugin>
                <groupId>org.springframework.boot</groupId>
                <artifactId>spring-boot-maven-plugin</artifactId>
                <configuration>
                    <skip>true</skip>
                </configuration>
            </plugin>
            <plugin>
                <artifactId>maven-source-plugin</artifactId>
                <executions>
                    <execution>
                        <id>attach-sources</id>
                        <phase>verify</phase>
                        <goals>
                            <goal>jar-no-fork</goal>
                        </goals>
                    </execution>
                </executions>
            </plugin>
        </plugins>
    </build>
六、配置好後打開cmd使用命令測試是否從私服下載jar包
mvn dependency:sources -DdownloadSources=true -DdownloadJavadocs=true- 如果看到你私服的ip了那麼恭喜你配置成功